How to Hang Hardie Plank A DIY Guide
How to hang Hardie Plank? It sounds intimidating, but transforming your home’s exterior with this durable and stylish siding is more achievable than you think! This guide walks you through every step, from gathering the right tools and prepping your surface to mastering the installation techniques and finishing touches. Get ready to upgrade your curb appeal with a project that delivers both beauty and lasting protection.
We’ll cover everything from choosing the right fasteners and understanding different nailing patterns to troubleshooting common issues and achieving a professional-looking finish. Whether you’re a seasoned DIYer or a first-timer tackling a home improvement project, this comprehensive guide will equip you with the knowledge and confidence to successfully install Hardie Plank siding.
Tools and Materials Needed for Hanging Hardie Plank

Source: advanceroofingllc.com
Getting started with your Hardie Plank project requires careful preparation. Having the right tools and materials on hand will ensure a smooth and efficient installation process, leading to a professional-looking finish. Failing to properly prepare can lead to delays and potentially costly mistakes.
Essential Tools
Gathering the necessary tools beforehand is crucial for a successful installation. The following list are the essential tools, categorized for clarity. Remember to check your tools for proper functionality before beginning.
- Measuring Tape: A 25-foot tape measure is ideal for accurate measurements of your siding area and individual planks.
- Level: A 4-foot level will help ensure straight and plumb installation, preventing unevenness in your siding.
- Chalk Line: Useful for marking straight lines for consistent spacing and alignment of the Hardie Plank.
- Circular Saw with Fine-Tooth Blade: A circular saw with a fine-tooth blade (at least 80 teeth) is essential for accurate cutting of the Hardie Plank. A blade designed for cutting fiber cement is recommended for a cleaner cut and longer blade life.
- Safety Glasses and Hearing Protection: Always prioritize safety! Wear safety glasses to protect your eyes from flying debris and hearing protection to minimize noise exposure.
- Drill with appropriate drill bits: You’ll need a drill to pre-drill pilot holes for fasteners. Use bits sized appropriately for the fasteners you’re using.
- Impact Driver: An impact driver is highly recommended for driving fasteners efficiently and preventing damage to the Hardie Plank.
- Jigsaw: A jigsaw can help cut intricate shapes or make cuts in tight spaces.
- Caulk Gun: For sealing gaps and joints between planks and around windows/doors.
- Putty Knife: For applying and smoothing caulk.
- Utility Knife: For trimming and cutting smaller pieces of Hardie Plank.
Hardie Plank Materials
Choosing the right Hardie Plank material is critical for both aesthetics and durability. Different types are available to suit various needs and architectural styles.
- Lap Siding: This is the most common type, characterized by overlapping planks for a classic look. It’s available in various profiles and thicknesses.
- Panel Siding: Larger panels offer faster installation but may require more precise cutting. They provide a more modern aesthetic.
- Shingles: These smaller pieces offer a unique look, ideal for accents or entire projects where a more textured finish is desired. They are often used for more intricate designs.
- Trim Boards: Used for finishing around windows, doors, and corners, providing a clean and professional look. These are usually thicker than the main siding.
- Fasteners: Appropriate fasteners are essential to ensure a secure and long-lasting installation (discussed in the next section).
Fastener Comparison
Selecting the right fasteners is vital for the longevity and structural integrity of your Hardie Plank installation. The following table compares common fastener types.
| Fastener Type | Advantages | Disadvantages | Recommended Use |
|---|---|---|---|
| Galvanized Nails | Cost-effective, readily available | Prone to corrosion, may require more frequent replacement | Less critical areas, budget-conscious projects |
| Stainless Steel Nails | Excellent corrosion resistance, long lifespan | More expensive than galvanized nails | All applications, especially in coastal or high-humidity environments |
| Exterior-Grade Screws | Strong hold, less prone to loosening than nails | More expensive than nails, requires pre-drilling | Applications requiring extra holding power, such as areas with high wind exposure |
| Hardie Plank Specific Fasteners | Engineered for optimal performance with Hardie Plank, often corrosion-resistant | May be more expensive | Preferred for all applications for optimal performance and longevity |
Preparing the Surface for Hardie Plank Installation
Source: thespruce.com
A properly prepared surface is crucial for a successful Hardie Plank installation. Neglecting this step can lead to poor adhesion, premature failure, and ultimately, costly repairs down the line. Think of it like painting a house – you wouldn’t skip prepping the walls, would you? The same principle applies here. A smooth, clean, and structurally sound surface ensures your Hardie Plank siding looks great and lasts for years.
Proper surface preparation involves several key steps designed to create the ideal foundation for your new siding. These steps ensure optimal adhesion, preventing issues like warping, cracking, and water damage. This section details the process of cleaning, addressing moisture problems, and ensuring the underlying structure is ready for the Hardie Plank.
Removing Old Siding
Removing existing siding is often the first step. This involves carefully removing any nails or staples securing the old material. Be cautious to avoid damaging the underlying sheathing. Different siding materials require different removal techniques. For instance, wood siding may require more careful prying to avoid splitting, while vinyl siding can often be removed more easily. Always wear appropriate safety gear, including gloves and eye protection, during this process. Proper disposal of the old siding is also important, following local regulations.
Addressing Moisture Issues
Moisture is the enemy of any exterior cladding. Before installing Hardie Plank, it’s vital to address any existing moisture problems. This might involve repairing leaks in the roof or flashing, ensuring proper ventilation in the wall cavity, and allowing ample time for any damp areas to completely dry. Using a moisture meter to check the moisture content of the sheathing is recommended; a reading above 19% indicates a need for further drying before proceeding. Ignoring moisture issues can lead to mold growth, rot, and ultimately, siding failure.
Ensuring Structural Integrity
Before installing Hardie Plank, inspect the underlying sheathing for damage. Replace any rotted, damaged, or loose sheathing. Ensure that all structural components, such as studs and framing, are sound and properly spaced. Any gaps or inconsistencies in the sheathing should be addressed by patching or replacing damaged sections. This ensures a solid and even surface for the Hardie Plank to adhere to, preventing issues with unevenness or sagging.
Surface Cleaning and Priming
Once the surface is structurally sound and dry, thorough cleaning is essential. Remove any dirt, dust, debris, loose paint, or other contaminants that might interfere with adhesion. A pressure washer can be effective for this, but use caution to avoid damaging the sheathing. After cleaning, allow the surface to dry completely. Applying a primer specifically designed for fiber cement siding enhances adhesion and provides a uniform base for the Hardie Plank. This primer acts as a bonding agent, improving the overall longevity and performance of the installation. Some primers also offer added protection against moisture. Always follow the manufacturer’s instructions for primer application and drying times.
Measuring and Cutting Hardie Plank
Accurate measuring and precise cutting are crucial for a professional-looking Hardie Plank installation that minimizes waste and ensures a perfect fit. Failing to do so can lead to gaps, mismatched seams, and ultimately, a less-than-ideal finished product. This section will guide you through the process, highlighting techniques for achieving clean, accurate cuts every time.
Precise measurements are the foundation of a successful Hardie Plank installation. Start by carefully measuring the area where you’ll be installing the planks. Account for any existing features like windows, doors, or corners. Remember to factor in the width of the overlaps between planks, typically recommended by the manufacturer. Use a measuring tape and a pencil to mark your measurements directly onto the wall or framing. Double-check your measurements to avoid costly mistakes. It’s better to take the extra time to be sure than to have to cut and re-cut planks.
Measuring Techniques for Hardie Plank
Accurate measurement prevents material waste and ensures a seamless finish. Begin by measuring the total length and width of the area needing coverage. Then, account for any overlaps or gaps required for proper installation, as specified in the manufacturer’s instructions. Use a combination of measuring tape and a level to ensure straight lines and accurate measurements. For intricate areas, break down the space into smaller, manageable sections for easier measuring and cutting. Consider using a chalk line to mark straight lines for consistent plank placement. Always double-check your measurements before making any cuts.
Safe Cutting Techniques for Hardie Plank
Hardie Plank can be cut using several tools, each with its own set of safety precautions. Always wear appropriate safety gear, including safety glasses and a dust mask, to protect yourself from flying debris and harmful particles.
Cutting Hardie Plank with a Circular Saw
A circular saw with a fine-toothed carbide blade designed for cutting fiber cement is ideal for straight cuts. Clamp the plank securely to a sturdy work surface. Use a sharp blade to ensure a clean cut and to minimize chipping. Make slow, steady cuts, avoiding jerky movements. Always use a push stick to maintain a safe distance from the blade, especially when cutting near the end of the plank. Remember to let the saw do the work; don’t force it.
Cutting Hardie Plank with a Hand Saw
For smaller cuts or more intricate work, a hand saw with a fine-tooth blade can be used. Again, secure the plank firmly and use slow, deliberate strokes to make a clean cut. A coping saw can be useful for curved cuts.
Cutting Hardie Plank with a Score-and-Snap Method
For straight cuts, scoring the plank with a utility knife and then snapping it along the scored line can be effective. This method requires a sharp utility knife and a steady hand. Score the plank deeply along the desired cut line. Then, carefully snap the plank along the scored line, using a sturdy surface to support the plank.
Minimizing Chipping and Damage
Chipping can be minimized by using a sharp blade, making slow, controlled cuts, and supporting the plank adequately. Using a fine-toothed blade is crucial, as coarse blades can lead to more chipping. Clamping the plank securely prevents movement during cutting, reducing the likelihood of damage. Consider using a scoring tool to create a guide for your saw, especially with more challenging cuts. Applying painter’s tape to the cut line can also help prevent chipping.
Installing Hardie Plank
Getting started with Hardie Plank installation is straightforward, but paying attention to detail will ensure a long-lasting, beautiful finish. Remember, we’re working from the bottom up, creating a solid foundation for each subsequent row. Proper fastening is key to preventing issues down the line, so let’s dive into the process.
Installing Hardie Plank involves a systematic approach, beginning with the bottom row and working your way up. This method ensures a level and consistent installation, minimizing potential problems later on. Accurate measurements and proper fastening techniques are crucial for a professional-looking finish that will withstand the elements.
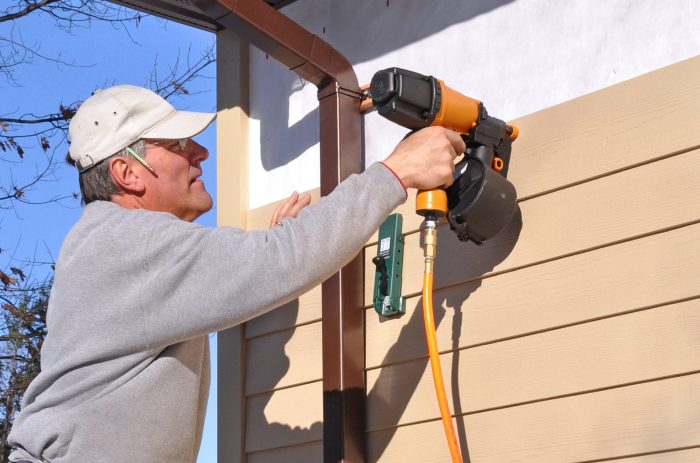
Installation Procedure
Begin by installing the first row of Hardie Plank at the bottom of the wall, ensuring it’s perfectly level. Use a level to check frequently and adjust as needed. Secure the plank using galvanized nails, following the manufacturer’s recommended nailing pattern. This usually involves placing nails at a specific distance from the edges and intervals along the length of the plank. Maintain consistent spacing for a professional appearance. Once the first row is secure, continue upwards, overlapping the edges of each subsequent row according to the manufacturer’s instructions. Remember to check the level of each row before moving on. Use shims to adjust for any unevenness in the wall surface.
Fastening Methods and Weather Considerations
Several fastening methods exist for Hardie Plank, each with its advantages and disadvantages. Galvanized nails are a common choice due to their corrosion resistance, crucial for outdoor applications. The spacing and depth of the nails are critical; too shallow and the plank might loosen; too deep and you risk splitting the material. The manufacturer’s instructions will specify the recommended nailing pattern, which often involves a staggered arrangement to distribute stress evenly. In regions with extreme weather conditions, such as high winds or heavy snow, consider using additional fasteners or employing stronger nails to enhance the structural integrity of the installation. For example, in hurricane-prone areas, using hurricane clips alongside nails is a common practice to secure the planks even more firmly against high winds.
Best Practices for a Seamless Finish
Proper planning and execution are crucial for achieving a seamless and aesthetically pleasing finish. Here are some best practices to consider:
- Always use galvanized nails to prevent rust and corrosion.
- Maintain consistent spacing between nails for a uniform appearance.
- Use a level frequently to ensure all rows are perfectly aligned.
- Caulk all joints and seams to prevent water penetration.
- Prime and paint the Hardie Plank according to the manufacturer’s instructions for optimal protection and longevity. Consider using a high-quality exterior-grade paint designed for fiber cement products.
- Cut planks precisely to minimize gaps and ensure a neat fit. Use a scoring tool followed by a clean snap to prevent chipping.
- Pre-drill pilot holes for fasteners in harder wood or other materials to avoid splitting.
- Allow sufficient expansion and contraction space between planks to accommodate temperature fluctuations. This is usually indicated in the manufacturer’s instructions and is crucial for preventing damage during seasonal changes.
Finishing Touches and Caulking

Source: perthfibrecement.com
You’ve successfully installed your Hardie Plank siding! Now it’s time to put the finishing touches on your project, ensuring a watertight and professional-looking exterior. This involves carefully caulking all gaps and seams, and neatly finishing the edges and corners. Paying attention to these details will significantly impact the longevity and aesthetic appeal of your siding.
Applying caulk is crucial for preventing water damage and creating a seamless look. We’ll cover the best practices for caulking and edge finishing to ensure your Hardie Plank installation stands the test of time.
Caulk Selection and Application, How to hang Hardie plank
Choosing the right caulk is essential. For exterior applications like Hardie Plank, you’ll want a high-quality, paintable, exterior-grade sealant designed for use with fiber cement. Look for a caulk that’s specifically labeled for this purpose, and that offers excellent adhesion and flexibility to accommodate movement in the siding. Silicone-based caulks are often a good choice due to their durability and water resistance. Avoid using cheap or inappropriate caulks, as they may crack, shrink, or fail to adequately seal the gaps, leading to potential water damage.
Before applying the caulk, ensure the surfaces are clean and dry. Use a quality caulking gun to apply a continuous, even bead of caulk into all gaps and joints between the Hardie Plank panels, around windows and doors, and where the siding meets other building materials. The bead should be smooth and slightly concave, not overly thick or thin. Immediately smooth the caulk with a wet finger or a caulking tool, creating a neat, finished look. Allow the caulk to cure completely according to the manufacturer’s instructions before painting.
Finishing Edges and Corners
Neatly finishing the edges and corners of your Hardie Plank is vital for a professional appearance. Pay close attention to the areas where the panels meet, ensuring a tight fit and minimizing gaps. Use appropriate trim pieces where necessary, such as J-channel, corner trim, or starter strips, to create clean, straight lines and protect the edges of the siding. These trim pieces should be installed before applying the caulk.
Properly mitering corners (cutting the trim at a 45-degree angle) provides a sharp, aesthetically pleasing finish. For straight cuts, ensure your cuts are precise and perpendicular to the surface. Any imperfections in cutting or fitting will be highly visible after the caulk is applied, so take your time and ensure accuracy. Use a sharp utility knife or a specialized siding saw for clean, precise cuts. Always wear appropriate safety gear, including safety glasses and gloves, when working with cutting tools.
Tool Selection and Techniques for Professional Finish
The tools you use significantly impact the quality of your finish. A sharp utility knife or a specialized siding saw is crucial for precise cutting. A quality caulking gun with a smooth trigger action ensures even caulk application. A wet finger or a caulking tool helps create a smooth, finished caulk bead. A putty knife can be useful for removing excess caulk and cleaning up any stray drips. Finally, a level will help ensure your Hardie Plank is installed straight and your trim pieces are properly aligned. Using these tools properly, combined with careful attention to detail, ensures a professional and lasting result.
Illustrative Examples of Hardie Plank Installation
Understanding how Hardie Plank should look when correctly installed, and recognizing common mistakes, is crucial for a long-lasting and aesthetically pleasing exterior. These illustrations, described in detail below, will help you avoid common pitfalls and achieve professional-looking results.
Correct Hardie Plank Installation
Imagine a section of wall clad in Hardie Plank. Each plank is neatly aligned, with consistent spacing between them. The bottom edge of each plank overlaps the top edge of the plank below, creating a clean, water-resistant seal. Notice the carefully applied flashing around windows and doors, preventing water intrusion. The nails are countersunk and properly spaced, ensuring a secure fastening without damaging the plank’s surface. Finally, all seams are neatly caulked with a paintable caulk, creating a smooth, continuous surface. The overall impression is one of precision and attention to detail. The color is uniform, showcasing the consistent application of paint or stain.
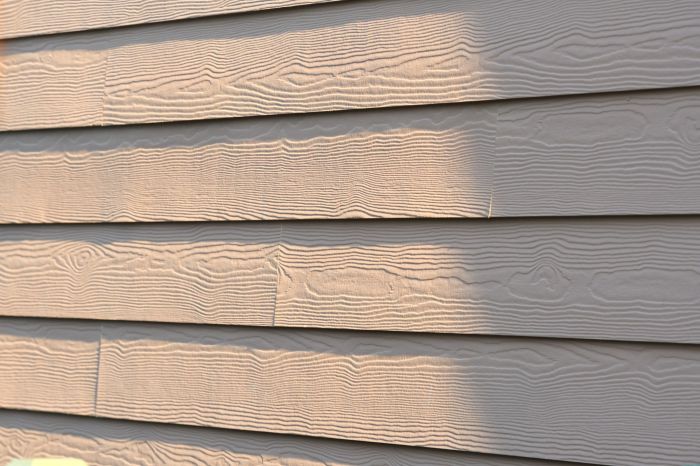
Common Mistake: Improper Overlap
This illustration shows a section of Hardie Plank where the overlap between planks is inconsistent. In some areas, the overlap is too small, leaving gaps that could allow water penetration. In other areas, the overlap is excessive, creating an uneven and unprofessional look. This improper overlap compromises the weather resistance of the siding. To correct this, remove the improperly installed planks. Re-measure and cut new planks to ensure consistent overlap, adhering to manufacturer’s recommendations. Pay close attention to maintaining a uniform gap between each plank. After reinstalling, caulk all seams to create a waterproof seal.
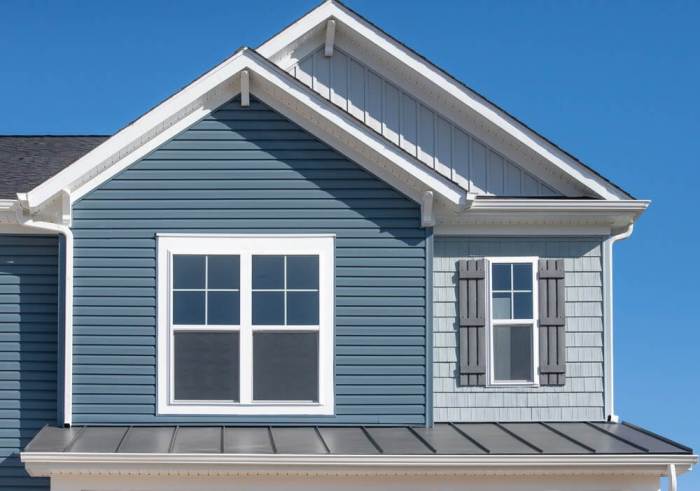
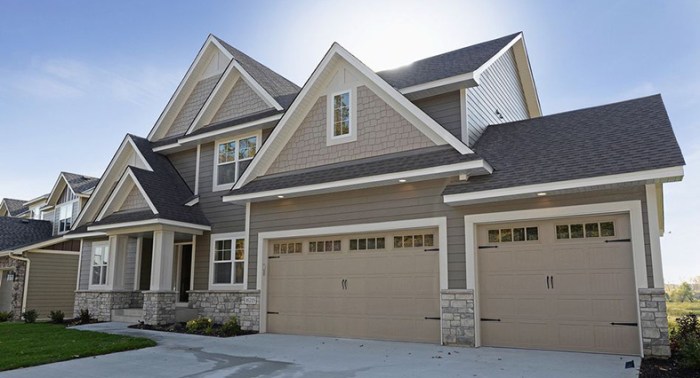
Hardie Plank Siding Styles and Applications
This illustration depicts several Hardie Plank siding styles. First, we see a traditional lap siding installation, characterized by horizontal planks with overlapping edges, providing a classic and timeless look, suitable for a variety of homes. Next, we see a vertical installation, offering a more modern aesthetic and often used on contemporary homes or to accentuate specific architectural features. A third example shows a combination of horizontal and vertical planks, creating a visually interesting design that adds character to the home’s exterior. Finally, we see an example using different widths of Hardie Plank to create a more textured and visually dynamic look. The choice of style depends on the homeowner’s preference and the overall architectural design of the house. Each style offers different visual impacts, and selecting the appropriate style can significantly enhance the curb appeal of the home.
Troubleshooting Common Hardie Plank Installation Issues
Installing Hardie Plank siding can present some challenges. Understanding potential problems and their solutions will help you achieve a professional-looking and long-lasting finish. This section will cover common issues and offer practical solutions to prevent and fix them. Proper preparation and careful attention to detail are key to avoiding many of these problems.
Improper Fastening
Incorrect fastening is a frequent source of problems. Using the wrong nails, spacing nails too far apart, or driving nails too deep or shallow can lead to damage and unsightly gaps. Over-driving nails can split the plank, while under-driving can result in loose planks and potential wind damage. Always use the recommended nails and follow the manufacturer’s guidelines for spacing and depth.
Gaps and Misalignment
Gaps between planks are another common issue. These can occur due to improper planning, inaccurate cutting, or expansion and contraction of the material. Careful measuring and cutting are essential, and it’s important to account for the natural movement of the Hardie Plank, particularly in areas with significant temperature fluctuations. Using expansion joints where necessary can help mitigate this problem. Misalignment can be caused by uneven framing or inconsistent spacing of the furring strips.
Moisture Damage
Hardie Plank is designed to withstand moisture, but improper installation can leave it vulnerable. Water can seep behind the siding if not properly flashed or caulked around windows and doors. Ensure all seams and openings are properly sealed to prevent water damage and potential rot. Proper ventilation behind the siding is also important to allow moisture to escape.
Damage During Installation
Rough handling or improper cutting techniques can easily damage Hardie Plank. Always use sharp blades to avoid chipping or cracking. Carefully handle the planks to prevent denting or scratching. Use appropriate safety gear, such as gloves, to protect yourself from splinters and sharp edges.
| Problem | Cause | Solution | Prevention |
|---|---|---|---|
| Improper Fastening | Wrong nails, incorrect spacing, improper depth | Remove and refasten using correct nails and spacing. Fill holes with appropriate filler. | Use recommended nails, follow manufacturer’s guidelines for spacing and depth. |
| Gaps and Misalignment | Improper measuring, inaccurate cutting, expansion/contraction, uneven framing | Fill small gaps with caulk. For larger gaps, replace affected planks. Address uneven framing. | Careful measuring and cutting. Use expansion joints. Ensure even framing and furring strip spacing. |
| Moisture Damage | Improper flashing, inadequate caulking, poor ventilation | Repair or replace damaged sections. Address flashing and caulking issues. Improve ventilation. | Proper flashing and caulking around windows and doors. Ensure adequate ventilation behind siding. |
| Damage During Installation | Rough handling, improper cutting techniques | Replace damaged planks. | Handle planks carefully. Use sharp blades for cutting. Wear appropriate safety gear. |
Closing Summary
Installing Hardie Plank siding is a rewarding project that significantly enhances your home’s aesthetic appeal and longevity. By following the steps outlined in this guide, paying close attention to detail, and prioritizing safety, you can achieve a stunning, professional-looking result. Remember, proper preparation and meticulous execution are key to a successful installation. So grab your tools, and let’s get started on transforming your home’s exterior!
Question Bank: How To Hang Hardie Plank
Can I install Hardie Plank over existing siding?
Sometimes, but it depends on the condition of the existing siding. It’s often best to remove old siding for a proper, long-lasting installation. Assess the condition thoroughly – rotten or damaged wood needs removal.
What’s the best way to clean Hardie Plank after installation?
A simple wash with water and a mild detergent is usually sufficient. Avoid harsh chemicals or abrasive cleaners.
How long does Hardie Plank siding last?
With proper installation and maintenance, Hardie Plank can last for decades, offering excellent resistance to weather damage.
What type of caulk should I use with Hardie Plank?
Use a high-quality, paintable exterior-grade caulk designed for use with fiber cement siding. Follow the manufacturer’s instructions for best results.
How do I cut Hardie Plank around windows and doors?
Precise measuring is crucial. Use a sharp blade and make test cuts on scrap pieces to ensure accuracy before cutting the actual planks. Consider using a jigsaw for intricate cuts.