How to Attach Hardie Plank A DIY Guide
How to attach Hardie Plank? It’s easier than you think! This guide walks you through every step, from choosing the right tools and preparing your surface to nailing (or screwing!) those planks into place. We’ll cover different installation methods, cutting techniques, and essential finishing touches to ensure a professional-looking, weather-resistant exterior. Get ready to transform your home’s exterior with this durable and stylish siding!
We’ll cover everything from selecting the appropriate Hardie Plank type for your project to mastering the art of precise cuts and achieving a seamless, weathertight finish. Whether you’re a seasoned DIYer or a complete beginner, this comprehensive guide will equip you with the knowledge and confidence to tackle your Hardie Plank installation with ease.
Tools and Materials Required for Hardie Plank Installation
Source: thespruce.com
Successfully installing Hardie Plank siding requires the right tools and materials. Having everything prepared beforehand will significantly speed up the process and ensure a professional-looking finish. This section details the essential tools and materials, categorized for easy reference.
Essential Tools for Hardie Plank Installation
Choosing quality tools will make the job easier and safer. Investing in durable, well-regarded brands will pay off in the long run. Below is a table outlining the necessary tools, their specifications, and brand recommendations where applicable.
| Category | Tool | Specifications | Brand Recommendation (Example) |
|---|---|---|---|
| Measuring Tools | Measuring Tape | 25ft or longer, durable casing | Stanley FatMax |
| Measuring Tools | Level | 4ft or longer, preferably a self-leveling laser level for larger projects | Bosch |
| Measuring Tools | Chalk Line | For marking straight lines | Empire |
| Cutting Tools | Circular Saw | 7 1/4″ blade with fine teeth designed for cutting fiber cement | DeWalt |
| Cutting Tools | Jigsaw | For intricate cuts | Makita |
| Cutting Tools | Hand Saw (Optional) | For smaller, precise cuts, especially in tight spaces | Bahco |
| Fastening Tools | Nail Gun | Coil nailer compatible with appropriate nails for Hardie Plank | Senco |
| Fastening Tools | Hammer (Optional) | For manual nailing, especially for smaller projects or touch-ups | Estwing |
| Safety Equipment | Safety Glasses | Impact-resistant, ANSI-approved | 3M |
| Safety Equipment | Hearing Protection | Ear plugs or muffs | 3M |
| Safety Equipment | Work Gloves | Durable, cut-resistant gloves | Mechanix Wear |
| Safety Equipment | Dust Mask | N95 respirator to protect against fiber dust | 3M |
Types of Hardie Plank and Their Applications
Hardie Plank siding comes in various profiles and finishes, each suited to different architectural styles and project needs. Choosing the right type will ensure a long-lasting, aesthetically pleasing result.
Common types include:
- Lap Siding: The classic, overlapping style, offering a traditional look. Suitable for a wide range of homes and applications.
- Panel Siding: Larger panels that speed up installation. Ideal for larger projects or when a more modern look is desired.
- Vertical Siding: Provides a contemporary, clean look. Often used on modern homes or to accentuate specific areas.
- Shake Siding: Imitates the look of natural wood shakes, offering a rustic appeal. Commonly used for accents or entire house cladding.
Consider factors such as the house’s style, the desired aesthetic, and the climate when selecting the appropriate Hardie Plank type. For example, lap siding is a versatile choice suitable for various architectural styles, while shake siding might be more appropriate for a rustic cabin.
Additional Materials
Beyond the tools, several materials are crucial for a successful Hardie Plank installation. These include:
- Hardie Plank Siding: Calculate the required amount accurately, accounting for waste.
- Nails: Galvanized nails specifically designed for fiber cement siding are essential for long-lasting performance. Use the recommended nail size and spacing for your chosen Hardie Plank type.
- Caulk: High-quality exterior-grade caulk to seal gaps and joints.
- Flashing: To protect vulnerable areas, such as window and door frames.
- Starter Strip: Provides a clean, even base for the first row of siding.
- J-Channel: Used for finishing edges and corners.
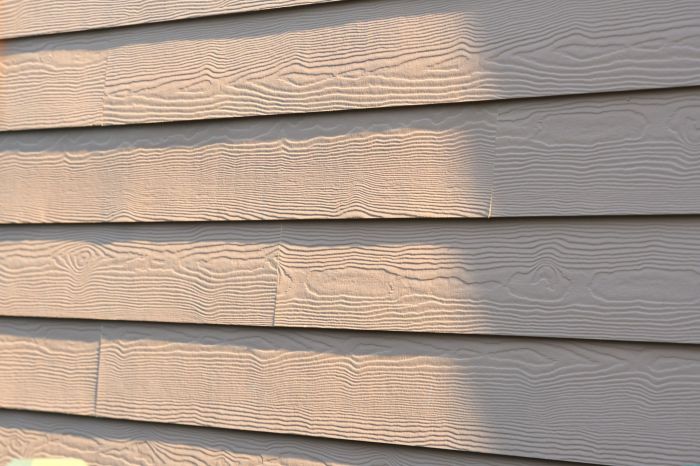
Preparing the Surface for Hardie Plank Attachment
Source: hubspotusercontent30.net
A properly prepared surface is crucial for a long-lasting and aesthetically pleasing Hardie Plank installation. Neglecting this step can lead to adhesion problems, premature failure, and ultimately, costly repairs. The success of your Hardie Plank siding depends heavily on creating a clean, dry, and even surface for the planks to adhere to.
Proper surface preparation ensures optimal adhesion of the Hardie Plank to the underlying structure. This prevents the siding from detaching due to wind, moisture, or other environmental factors. A well-prepared surface also allows for a more consistent and professional-looking finish. Different surface types require different preparation methods, so understanding these differences is key.
Surface Cleaning and Preparation Methods
Cleaning the surface removes dirt, debris, loose paint, mildew, and other contaminants that can interfere with adhesion. This step is vital regardless of the substrate material. For wood surfaces, use a stiff brush and appropriate cleaning solution to remove any loose material. Concrete surfaces may require pressure washing to remove efflorescence (a white, powdery deposit) and other ingrained dirt. Metal surfaces should be thoroughly cleaned and any rust or flaking paint removed. Always allow the surface to dry completely before proceeding.
Addressing Unevenness in the Surface
Uneven surfaces can lead to gaps and inconsistencies in the Hardie Plank installation. Minor imperfections can often be addressed with patching compound or caulk. For more significant unevenness, you might need to consider using shims or furring strips to create a level surface. Remember to allow sufficient time for patching compounds to cure completely before continuing with the installation. This ensures a stable and even base for your Hardie Plank. For example, if you find significant variations in a concrete wall, applying a layer of cement-based patching compound can create a smoother, more uniform surface.
Managing Moisture Content in the Substrate
Excessive moisture in the underlying substrate can cause problems with Hardie Plank adhesion and lead to mold and mildew growth. Before installation, ensure the moisture content of the substrate is within acceptable limits. Wood should have a moisture content of around 12-15%, while concrete should be dry to the touch. Use a moisture meter to accurately measure the moisture content if necessary. Allow adequate time for drying if moisture levels are too high. In situations where high moisture is a persistent issue, consider using a vapor barrier to prevent moisture from migrating to the Hardie Plank. For example, a damp wood wall may require weeks of drying time before the Hardie Plank installation can commence.
Measuring and Cutting Hardie Plank: How To Attach Hardie Plank
Precise measuring and cutting are crucial for efficient Hardie Plank installation, minimizing waste and ensuring a professional finish. Accurate cuts save you money and time, and prevent frustrating rework. Let’s explore the best techniques and tools for achieving clean, accurate cuts.
Before you even pick up a saw, careful measurement is key. Always measure twice, and cut once! Use a tape measure to determine the exact length needed for each plank, accounting for overlaps and any necessary cuts around windows or doors. Mark your cutting lines clearly with a pencil, ensuring they’re straight and precise. Consider using a speed square for perfectly squared cuts, especially for corners and edges. Remember to account for expansion and contraction of the material; Hardie Plank can expand and contract depending on the weather, so leaving a small gap where necessary is essential. Always refer to the manufacturer’s instructions for specific recommendations regarding expansion gaps.
Cutting Hardie Plank with a Circular Saw
Using a circular saw offers speed and efficiency, particularly for long cuts. However, it’s essential to prioritize safety. Always wear safety glasses, hearing protection, and a dust mask. Use a fine-toothed blade specifically designed for cutting fiber cement; a standard wood-cutting blade won’t suffice and may damage the blade. Clamp the Hardie Plank securely to a sturdy work surface to prevent movement during cutting. Make a slow, steady cut, allowing the blade to do the work. Avoid forcing the saw, as this can lead to inaccurate cuts and damage the blade. A quality circular saw with a powerful motor will make the cutting process much easier.
Cutting Hardie Plank with a Scoring Tool
A scoring tool, often combined with a snap cutter, is ideal for making precise, straight cuts, especially for shorter lengths. This method is generally quieter and produces less dust than a circular saw. First, score the plank along your marked line using the scoring tool, applying firm but even pressure. Then, carefully snap the plank along the scored line using a snap cutter or by applying pressure from both sides. This method is best for straight cuts and is less suitable for intricate shapes or curves. Remember to wear safety glasses to protect your eyes from flying debris.
Comparison of Cutting Methods
| Cutting Method | Advantages | Disadvantages |
|---|---|---|
| Circular Saw | Fast, efficient for long cuts, suitable for various angles | Noisy, produces dust, requires safety precautions, potentially more prone to chipping |
| Scoring Tool & Snap Cutter | Precise, quieter, less dust, ideal for straight cuts | Slower for long cuts, not suitable for curves or intricate shapes, requires practice |
Attaching Hardie Plank
Now that you’ve prepped your surface and cut your Hardie Plank to size, it’s time to get it attached! This is where the real work begins, and choosing the right method will depend on your project’s specifics and your comfort level with different tools. We’ll cover the most common methods: nailing, screwing, and adhesive.
Methods of Hardie Plank Attachment
There are several ways to attach Hardie Plank siding, each with its advantages and disadvantages. The best method often depends on factors like the type of substrate, climate conditions, and personal preference. Let’s break down the three primary approaches: nailing, screwing, and adhesive.
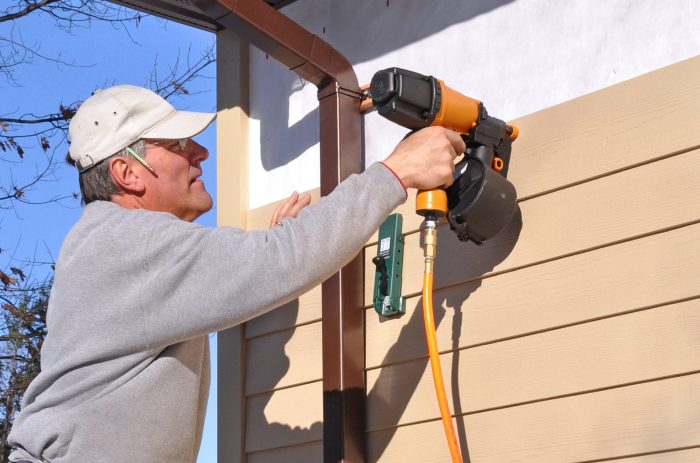
- Nailing: This is a common and relatively quick method. Use galvanized nails specifically designed for Hardie Plank to prevent rust and ensure proper holding power. The nails should be driven at a slight angle to help prevent them from popping out later. However, nailing can be less forgiving if you misplace a nail, and nail holes are more visible than screw holes.
- Screwing: Screws offer superior holding power and are less likely to pop out than nails, especially in areas with high wind or expansion/contraction. They also provide a more secure fastening, crucial in certain climates. However, screwing takes longer and requires more precision than nailing. Pre-drilling pilot holes is recommended to prevent the Hardie Plank from splitting.
- Adhesive: Construction adhesive can be used in conjunction with nailing or screwing, particularly for larger panels or in areas needing extra support. It provides a strong bond and helps to prevent moisture penetration. However, adhesive alone is generally not recommended as the primary fastening method due to the potential for movement and stress on the bond.
Proper Spacing and Alignment
Maintaining consistent spacing and alignment is crucial for a professional-looking finish. Uneven spacing can create unsightly gaps and compromise the weather resistance of the siding. Here’s what you need to consider:
- Spacing: Follow the manufacturer’s recommendations for nail or screw spacing. This usually involves a specific distance between fasteners, both horizontally and vertically, to allow for expansion and contraction of the material. Inconsistent spacing can lead to warping or buckling.
- Alignment: Use a level and straight edge frequently to ensure each plank is perfectly aligned with the ones above and below it. Slight misalignments can accumulate, resulting in a noticeable unevenness across large areas. Take your time and double-check your work at each step.
Installation Steps and Techniques
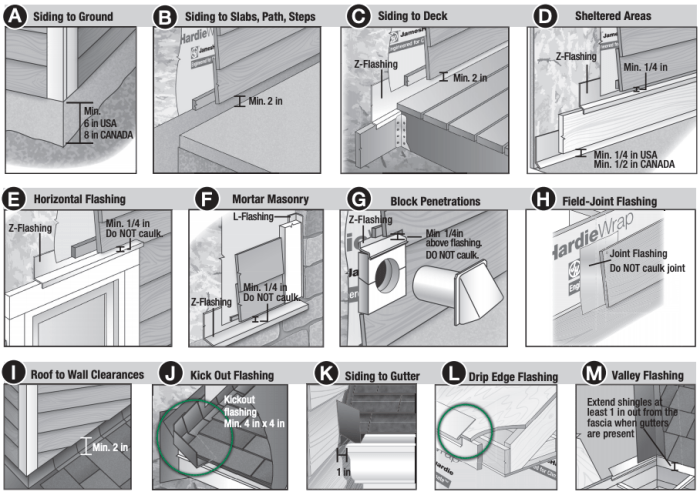
Proper installation involves more than just attaching the planks. Flashing and caulking are crucial steps for preventing water damage. Here’s a step-by-step guide:
- Start at a Corner: Begin installing the first plank at a corner, ensuring it’s perfectly plumb and aligned. This sets the standard for the rest of the installation.
- Install Flashing: Before attaching the first course of siding, install flashing around windows, doors, and other penetrations in the wall to prevent water intrusion. Proper flashing is critical for long-term durability. Overlapping flashing pieces are crucial to prevent water from getting behind the siding.
- Attach Hardie Plank: Using your chosen method (nails, screws, or a combination), fasten each plank according to manufacturer’s specifications, maintaining consistent spacing and alignment.
- Caulk Joints: After installing each plank, caulk all seams and joints between planks and around windows and doors to create a watertight seal. Use a high-quality exterior-grade caulk.
- Finishing Touches: Once all the planks are installed, inspect the entire installation for any gaps, misalignments, or loose fasteners. Address any issues promptly to ensure a quality and lasting installation.
Finishing Touches and Additional Considerations

Source: squarespace-cdn.com
After you’ve installed the Hardie Plank siding, there are a few crucial steps to ensure a long-lasting, beautiful, and weatherproof finish. Proper caulking and sealing are essential, and understanding how to maintain your siding will extend its lifespan significantly. Addressing potential problems proactively can save you headaches down the road.
This section covers the final steps in Hardie Plank installation, focusing on weatherproofing, long-term care, and troubleshooting common issues.
Caulking and Sealant Application
Caulking and sealant are vital for weatherproofing your Hardie Plank siding. They prevent water penetration, which can lead to rot and damage. Apply a high-quality, paintable exterior-grade caulk to all seams, joints, and areas where the siding meets other building materials like windows, doors, and trim. Use a caulking gun for even application, ensuring the caulk fills the gaps. Smooth the caulk with a wet finger or a caulking tool for a neat, professional finish. Remember to choose a color that closely matches your siding for a seamless aesthetic. Consider using a paintable sealant around any penetrations like pipes or vents for extra protection.
Hardie Plank Siding Maintenance, How to attach hardie plank
Regular maintenance will keep your Hardie Plank siding looking its best and extend its life. A simple yearly inspection can identify and address minor problems before they escalate. Cleaning the siding with a pressure washer (using a low-pressure setting to avoid damage) and a mild detergent solution is recommended. This will remove dirt, mildew, and other debris. If you notice any signs of damage, such as cracks or loose pieces, address them promptly. Repainting or resealing may be necessary every few years, depending on the climate and exposure to the elements. A fresh coat of paint will not only enhance the appearance but also provide added protection against the weather.
Troubleshooting Common Installation Problems
Despite careful planning and execution, problems can arise during Hardie Plank installation. Understanding these potential issues and their solutions is key to a successful project. For example, if you notice gaps between planks, it’s likely due to improper measuring or cutting. Rectifying this might involve removing and reinstalling the affected sections. Uneven siding could indicate issues with the underlying sheathing or framing – ensure a level and straight surface before installation. If the siding is buckling or warping, it might be due to improper acclimation to the environment before installation. Always follow the manufacturer’s recommendations for acclimation periods. Finally, if you experience issues with nail pops, consider using longer nails or additional fasteners for a more secure hold.
Illustrative Examples of Hardie Plank Installation

Source: architecturesideas.com
This section details three distinct Hardie Plank installation scenarios, highlighting the process, challenges, and final aesthetic for each. Understanding these examples will help you confidently tackle your own Hardie Plank project, regardless of complexity.
Horizontal Hardie Plank Installation on a Shed
This example involves installing Hardie Plank horizontally on a 10ft x 8ft shed with a simple gable roof. We’ll use 12-inch wide Hardie Plank in a classic gray color. The shed’s framing is already in place and properly sheathed with plywood.
The installation begins with establishing a level baseline along the bottom of one shed wall. This is crucial for a neat and aligned finish. We then measure and cut the first plank to fit, ensuring a snug fit against the corner. We use galvanized nails, spaced approximately every 6 inches, driving them slightly below the surface of the plank to allow for caulking later. Each subsequent plank is installed horizontally, overlapping the previous one by about 1/2 inch. We use a self-leveling caulking gun to apply sealant to all vertical and horizontal joints to prevent water infiltration. The process is repeated on all four walls, paying close attention to maintaining consistent horizontal alignment. Around windows and doors, we carefully measure and cut the planks to fit, using a jigsaw for precise cuts. Corners are mitered for a clean, professional look. The finished product showcases the clean lines of horizontal siding, creating a classic and timeless aesthetic. The gray Hardie Plank provides a subtle, sophisticated look that complements the shed’s simple design. The texture is smooth, with a slightly grainy feel, providing a sophisticated contrast to the surrounding landscape.
Vertical Hardie Plank Installation on a House
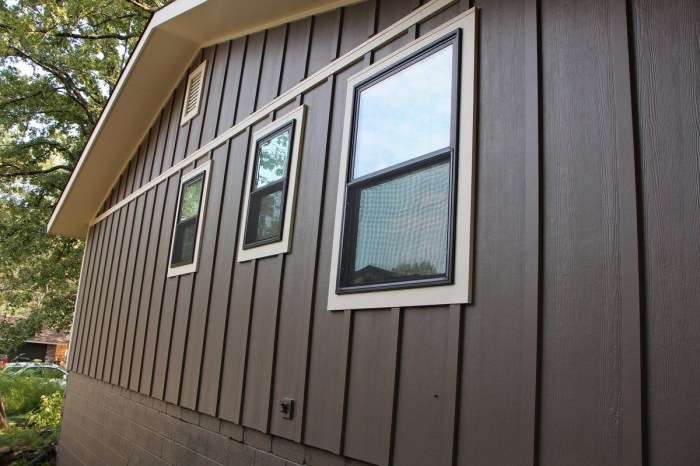
This scenario involves installing Hardie Plank vertically on a 20ft section of a house exterior wall. We’ll use 8-inch wide planks in a rich, deep brown color. The existing wall is properly sheathed and prepared.
Starting at one corner, we establish a plumb line to ensure perfectly vertical installation. The first plank is carefully measured and cut, ensuring a tight fit. We use stainless steel nails for superior corrosion resistance, again spaced every 6 inches. Subsequent planks are installed vertically, butting them tightly together. We use a construction adhesive in addition to nails for extra security, especially in areas prone to high winds. Vertical installation requires extra care to maintain perfectly straight lines. Any slight misalignment will be highly visible. Jigs and levels are essential for this project. We use a speed square to ensure accurate cuts around windows and doors. The finished result presents a modern, sleek appearance. The vertical orientation emphasizes the height of the house, creating a sense of grandeur. The deep brown color adds warmth and sophistication, contrasting beautifully with the surrounding landscaping and other architectural features. The texture of the Hardie Plank is subtle, with a slight grain visible upon closer inspection.
Complex Corner Installation with Hardie Plank
This example focuses on a challenging corner installation, incorporating both horizontal and vertical planks. We’ll use a combination of 12-inch and 6-inch wide planks in a light beige color, showcasing a mix of textures and patterns. The area involves an outside corner and a change in siding orientation.
This installation requires precise measuring and cutting. We begin by installing horizontal planks along one wall, ensuring a perfect alignment with the corner. At the corner, we miter the ends of the horizontal planks at a 45-degree angle. The vertical planks are then installed, also mitered at a 45-degree angle to meet the horizontal planks, creating a seamless transition. This requires careful planning and execution, ensuring all cuts are precise and the planks fit snugly together. We use a combination of nails and construction adhesive for superior strength and weather resistance in this high-stress area. The finished corner showcases the craftsmanship and attention to detail. The combination of horizontal and vertical planks adds visual interest, while the light beige color provides a neutral backdrop that complements various architectural styles. The varied widths of the planks create a dynamic texture, adding depth and dimension to the overall appearance. The interplay of textures and lines creates a visually rich and sophisticated finish.
Conclusion
Installing Hardie Plank siding can significantly enhance your home’s curb appeal and protect it from the elements. By following the steps outlined in this guide, paying close attention to surface preparation, and employing proper fastening techniques, you can achieve a beautiful, long-lasting result. Remember, patience and attention to detail are key to a successful installation. So grab your tools, and let’s get started!
Questions and Answers
Can I install Hardie Plank over existing siding?
It depends on the condition of the existing siding. If it’s sound and properly prepared, it might be possible. However, it’s best to consult with a professional to assess the feasibility and ensure proper installation.
What’s the best way to clean Hardie Plank after installation?
A simple rinse with water and a soft brush is usually sufficient. For tougher stains, use a mild detergent solution. Avoid harsh chemicals or abrasive cleaners.
How long does Hardie Plank siding last?
With proper installation and maintenance, Hardie Plank siding can last for decades, offering excellent durability and weather resistance.
What type of nails or screws should I use?
Use galvanized nails or screws specifically designed for exterior use and compatible with Hardie Plank. Follow the manufacturer’s recommendations for nail/screw size and spacing.
How do I handle cuts and waste disposal?
Use appropriate safety gear when cutting Hardie Plank (dust mask, eye protection). Dispose of waste according to local regulations. Many recycling centers accept Hardie Plank scraps.