How to Attach Hardie Siding A DIY Guide
How to attach Hardie siding? It’s a question many homeowners ask when considering a durable and attractive exterior. This guide walks you through the entire process, from prepping your walls and choosing the right materials to mastering tricky areas like corners and gables. We’ll cover different installation methods, essential tools, and helpful tips to ensure a professional-looking finish that will stand the test of time. Get ready to transform your home’s exterior!
Hardie siding, known for its strength and weather resistance, offers a significant upgrade over traditional materials. However, successful installation requires careful planning and execution. This guide provides a comprehensive step-by-step approach, covering everything from initial surface preparation to the final finishing touches and ongoing maintenance. Whether you’re a seasoned DIYer or a complete novice, we’ll equip you with the knowledge and confidence to tackle this project.
Understanding Hardie Siding

Source: guardingyou.com
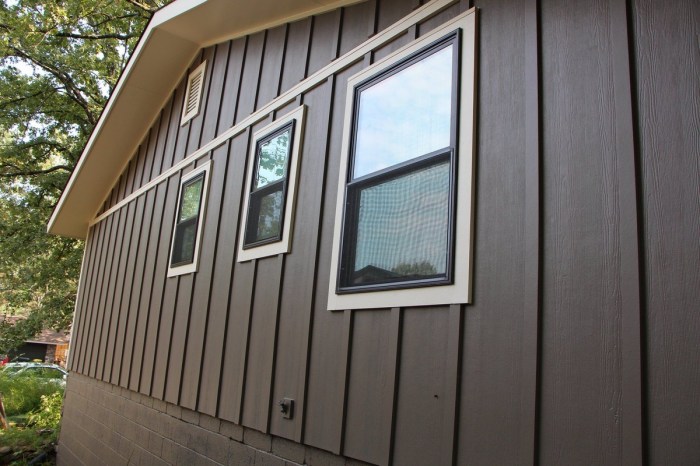
Hardie siding, also known as fiber cement siding, is a popular exterior cladding choice for its durability and aesthetic appeal. It’s a composite material made from cement, cellulose fibers, and other additives, offering a strong and long-lasting alternative to traditional wood or vinyl siding. Understanding its different types and properties is crucial for a successful installation.
Hardie Siding Types
Several types of Hardie siding cater to various architectural styles and preferences. Each type offers unique characteristics in terms of texture, appearance, and installation method. Choosing the right type depends on the project’s specific requirements and the homeowner’s aesthetic vision.
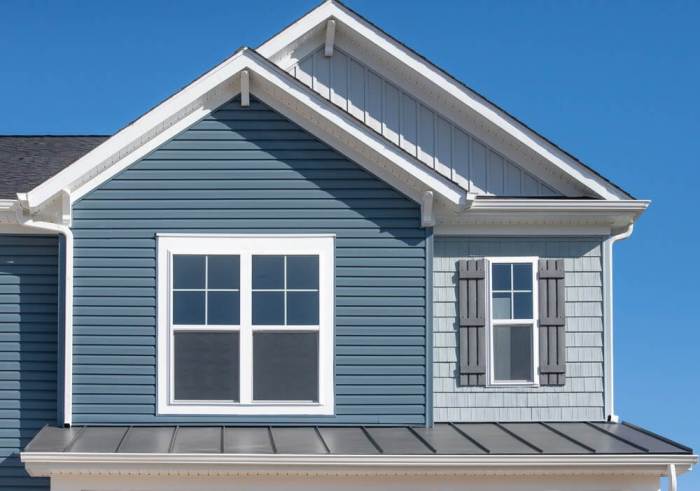
- Lap Siding: This classic style mimics the look of traditional wood lap siding, offering a clean, timeless appearance. It’s available in various widths and profiles to suit different tastes.
- Panel Siding: Larger panels provide faster installation compared to lap siding. These panels are ideal for modern or contemporary designs, offering a sleek, clean look.
- Shingle Siding: This option replicates the look of wood shingles, offering a rustic and charming aesthetic. It’s often used to create a more textured and visually interesting exterior.
- Vertical Siding: This style provides a modern and linear look, often used in contemporary or minimalist designs. Its vertical orientation offers a distinct visual contrast to traditional horizontal siding.
Advantages and Disadvantages of Hardie Siding
Hardie siding boasts several advantages over other siding materials, but it’s essential to be aware of its limitations as well. A balanced understanding will help homeowners make informed decisions.
- Advantages: Hardie siding is incredibly durable, resistant to fire, rot, and insect damage. It requires minimal maintenance and offers excellent weather protection, resulting in a long lifespan. Its versatility allows it to mimic the look of wood, stone, or brick, providing diverse aesthetic options.
- Disadvantages: Hardie siding is generally more expensive than vinyl or wood siding. It’s heavier than vinyl, potentially increasing installation complexity. It can be brittle and prone to cracking if mishandled during installation. Proper cutting and handling techniques are crucial to avoid damage.
Tools and Materials for Hardie Siding Installation
Proper tools and materials are essential for a successful and safe Hardie siding installation. Using the right equipment ensures efficient work and a high-quality finish. Failing to use appropriate tools can lead to damage to the siding or injury to the installer.
- Tools: Measuring tape, circular saw with a fine-toothed blade specifically designed for fiber cement, safety glasses, hearing protection, work gloves, level, chalk line, hammer, nail gun (recommended), pry bar, utility knife, caulk gun.
- Materials: Hardie siding panels, appropriate nails or fasteners for Hardie siding, starter strips, J-channel, corner trim, flashing (where needed), caulk, sealant.
Preparing the Surface for Installation
Getting your wall ready is crucial for a long-lasting, beautiful Hardie siding job. Proper preparation ensures the siding adheres correctly and prevents future problems like water damage and cracking. This involves cleaning the surface, addressing any imperfections, and ensuring the right level of dryness.
Before you even think about attaching the first panel, you need a clean, dry, and structurally sound wall. This means removing any loose debris, old paint (if applicable, and ensuring any underlying sheathing is in good condition. Any significant damage to the sheathing needs to be repaired before proceeding.
Wall Surface Cleaning and Preparation
Thoroughly cleaning the wall surface removes dirt, dust, mildew, and other contaminants that can interfere with the adhesive. Use a pressure washer to blast away loose material, taking care not to damage the underlying structure. For stubborn stains, consider using a suitable cleaning solution according to the manufacturer’s instructions. Allow the wall to completely dry before moving to the next step. Any loose or damaged wood should be replaced or repaired using appropriate techniques. This might involve patching holes, replacing rotten sections, or reinforcing weak areas with additional bracing.
Moisture Management and Prevention
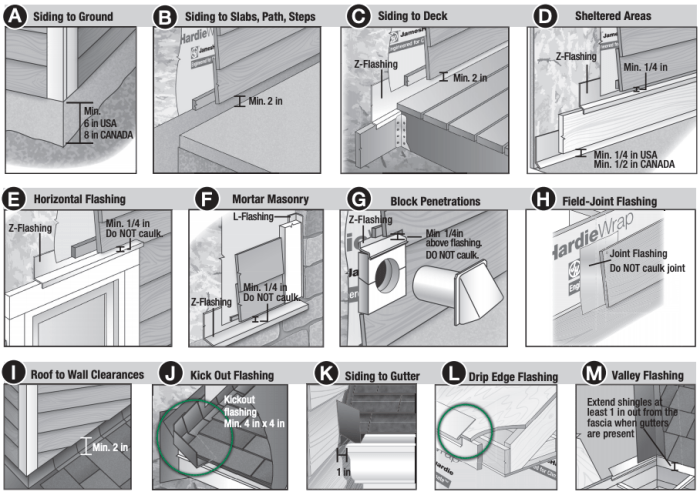
Moisture is the enemy of Hardie siding and any exterior building material. High moisture content in the wall can lead to mold growth, rot, and ultimately, siding failure. Before installation, ensure the wall’s moisture content is within acceptable limits. You can use a moisture meter to check the wood sheathing. If moisture levels are too high, allow the wall to dry completely before proceeding. Proper flashing and sealing around windows and doors are also critical to prevent water intrusion behind the siding. These areas are common points of water leakage. Consider using a waterproof membrane or house wrap behind the siding for additional protection.
Measuring and Cutting Hardie Siding Panels, How to attach hardie siding
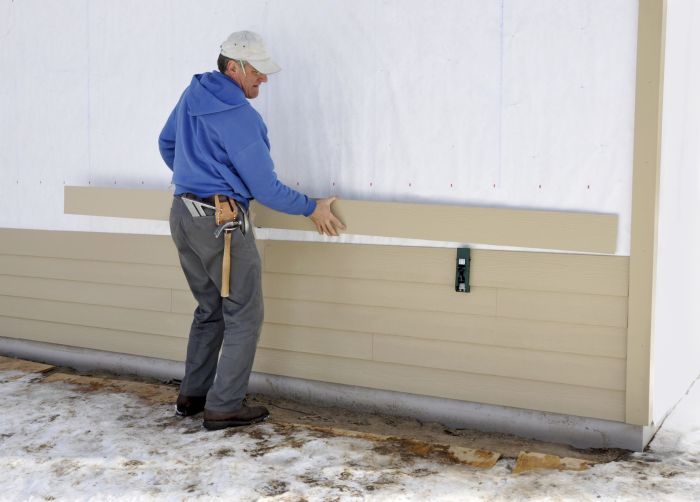
Accurate measurements are key to a professional-looking installation. Measure the wall height and width carefully, accounting for any overlaps or cuts required to fit around windows and doors. Use a sharp utility knife or a circular saw with a fine-tooth blade to cut the panels. Always wear appropriate safety gear, including eye protection and gloves. For intricate cuts, consider using a jigsaw for greater precision. When cutting, ensure the cuts are straight and clean to minimize the risk of damage to the panel edges. Remember to always measure twice and cut once! Precise cuts save time and materials, resulting in a neater, more professional finish.
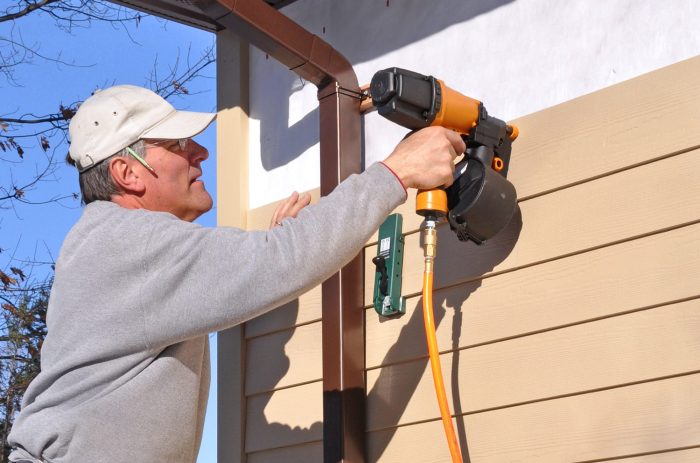
Attaching Hardie Siding
Installing Hardie siding involves several methods, each with its advantages and disadvantages. Choosing the right method depends on factors like the siding type, your experience level, and the specific project requirements. Proper installation is crucial for ensuring a long-lasting, weather-resistant exterior.
Methods of Attaching Hardie Siding
Hardie siding can be attached using either nails or screws. Nails are generally faster and easier for simpler installations, while screws offer greater holding power and are preferred for larger projects or areas exposed to high winds. Screws also allow for easier removal and replacement of individual pieces if needed. However, over-tightening screws can damage the siding. Always follow the manufacturer’s recommended fastening guidelines. Using the wrong fastener can lead to damage or failure of the siding.
Installing Starter Strips and J-Channels
Starter strips and J-channels are essential components for a neat and professional-looking Hardie siding installation. The starter strip provides a straight, level base for the first course of siding, ensuring a consistent alignment across the entire wall. J-channels create a clean, finished look at corners and around windows and doors. They also allow for expansion and contraction of the siding, preventing damage from temperature fluctuations.
To install a starter strip, hold it level against the sheathing and secure it with nails or screws, spaced according to the manufacturer’s recommendations. Ensure the strip is flush with the sheathing to provide a solid base for the siding. J-channels are installed similarly, making sure the channel is properly aligned and secured to provide a smooth transition between siding panels. Carefully check for alignment at all stages.
Recommended Nail/Screw Spacing
The recommended spacing for nails and screws varies depending on the type of Hardie siding and local building codes. Always consult the manufacturer’s instructions for your specific product. The table below provides general guidelines, but always prioritize the manufacturer’s recommendations.
| Siding Type | Nail Spacing (inches) | Screw Spacing (inches) | Notes |
|---|---|---|---|
| Lap Siding | 6-8 | 8-12 | May vary based on panel length and wind load |
| Panel Siding | 8-10 | 10-12 | Consider using additional fasteners at panel edges |
| Shingles | 6-8 | 8-10 | Fasteners should penetrate the underlying sheathing |
| Soffit | 8-12 | 10-12 | Ensure proper ventilation |
Always pre-drill pilot holes when using screws to prevent splitting the siding.
Handling Corners and Tricky Areas

Source: advanceroofingllc.com
Working with Hardie siding around corners, windows, and doors requires precision and attention to detail. Proper installation in these areas ensures a professional-looking finish and protects your home from the elements. This section will cover techniques for achieving a seamless look and maximizing the longevity of your siding.
Installing Siding Around Windows and Doors
Properly installing siding around windows and doors involves using J-channels and trim pieces to create a neat and weathertight seal. First, install the J-channel around the perimeter of the window or door opening before applying the siding. This channel provides a clean edge and a place for the siding to butt against. Next, measure and cut the siding pieces to fit snugly against the J-channel. Use a trim piece to cover the gap between the siding and the window or door frame. Ensure all seams are sealed with appropriate caulk to prevent water intrusion. Remember to always pre-drill holes to avoid splitting the Hardie board. This is particularly important around windows and doors where the siding may be under more stress.
Mitering Corners for a Seamless Finish
Achieving a crisp, professional look on exterior corners requires mitering the siding pieces. Mitering involves cutting the ends of two siding pieces at a 45-degree angle so they meet neatly at the corner. Accurate measuring and cutting are crucial for a perfect fit. Use a miter saw for precise cuts. Apply construction adhesive to the back of each piece before attaching them to the corner. This provides additional strength and helps prevent gaps. Once the pieces are securely fastened, apply caulk to seal the joint completely. For inside corners, use inside corner trim. This trim provides a clean finish and protects the corner from the elements.
Gable End Siding Installation
Imagine a gable end as a triangle. Start by installing a starter strip along the bottom edge of the gable. Next, install the first course of siding horizontally, starting from the bottom and working your way up. Each subsequent course will overlap the previous one. As you approach the peak of the gable, you’ll need to cut the siding pieces to fit the angle of the roofline. This often requires precise measuring and cutting to ensure a clean, even finish. For the final pieces, you might need to use smaller cuts to perfectly fit the space. It is helpful to visualize the process as working from the bottom upwards, creating horizontal rows that gradually shrink in size until reaching the peak. The visual representation below illustrates this.
“`
/\
/ \
/ \ <– Smaller pieces at the top
/______\
| |
| | <– Larger pieces at the bottom
|________|
“`
Finishing Touches and Maintenance
Source: pinimg.com
You’ve successfully installed your Hardie siding, but the final steps are crucial for ensuring its long-term beauty and durability. Proper caulking and sealing, along with a regular maintenance schedule, will protect your investment and keep your home looking its best for years to come. Neglecting these steps can lead to water damage, which is the biggest enemy of any exterior cladding.
Caulking and sealing are essential to prevent water intrusion. These small gaps, often overlooked, are entry points for moisture that can lead to rot, mold, and structural damage. Think of it as creating a watertight barrier around your entire house. Careful attention to detail in this phase will pay dividends in the long run.
Caulking and Sealing Gaps
Proper caulking is vital in preventing water damage. All gaps around windows, doors, and other penetrations in the siding should be filled with a high-quality, paintable exterior-grade caulk. Choose a caulk specifically designed for exterior use and that’s compatible with fiber cement siding. Apply the caulk smoothly and evenly, ensuring complete coverage of the gap. Allow the caulk to cure completely according to the manufacturer’s instructions before painting. Pay close attention to areas prone to expansion and contraction, such as corners and joints, as these are especially vulnerable to water infiltration. Regular inspection and recaulking as needed will prevent future problems.
Maintenance Tips for Hardie Siding
Regular maintenance is key to extending the life of your Hardie siding. A simple yearly inspection can identify and address minor issues before they become major problems. This preventative approach is far less expensive and time-consuming than dealing with significant water damage later.
- Annual Inspection: Check for loose or damaged siding, cracks in the caulk, and signs of water damage. Address any issues promptly.
- Cleaning: Wash your siding with a pressure washer (using a low-pressure setting to avoid damage) and a mild detergent solution at least once a year, or more frequently if needed. This removes dirt, grime, and mildew, maintaining the siding’s appearance and preventing the buildup of contaminants that can affect its longevity.
- Repairing Damage: Small chips or cracks can be repaired using a patching compound specifically designed for fiber cement siding. Larger areas of damage may require replacing sections of siding.
- Painting (if applicable): If you have painted Hardie siding, repaint it every 5-10 years, or as needed, to maintain its color and protect it from the elements. Follow the manufacturer’s recommendations for paint type and application.
Cleaning and Weather Protection
Regular cleaning is crucial for preserving the appearance and longevity of your Hardie siding. A yearly cleaning with a pressure washer (low pressure setting!) and a mild detergent solution is recommended. For stubborn stains, consider using a specialized siding cleaner following the manufacturer’s instructions. Avoid abrasive cleaners or harsh chemicals that could damage the siding’s surface.
Protecting your Hardie siding from the elements is equally important. Regularly inspect the caulking and reseal as needed to prevent water intrusion. Consider adding a protective sealant or paint to further enhance the siding’s weather resistance, especially in harsh climates. Remember, preventative maintenance is the best way to ensure your Hardie siding remains beautiful and functional for many years to come.
Safety Precautions
Source: lifetime-exteriors.net
Installing Hardie siding, while rewarding in terms of a beautiful and durable exterior, presents several potential hazards. Understanding and mitigating these risks is crucial for a safe and successful project. Failing to prioritize safety can lead to serious injury or even death.
Working at heights, handling sharp materials, and exposure to potentially hazardous substances are just some of the concerns. This section includes essential safety measures to protect yourself and others throughout the installation process. Remember, safety is not just a guideline; it’s a non-negotiable requirement.
Potential Hazards Associated with Hardie Siding Installation
Hardie siding installation involves working at heights, often on ladders or scaffolding. Falls from these elevated positions are a major risk, potentially resulting in serious injuries like fractures, head trauma, or even fatalities. The siding itself, while durable, has sharp edges and can cause cuts or lacerations. Furthermore, the use of power tools like circular saws, nail guns, and drills increases the risk of cuts, impacts, and eye injuries. Finally, some of the materials used in the installation process, such as certain primers or sealants, may contain volatile organic compounds (VOCs) requiring proper ventilation and respiratory protection.
Safety Measures During Installation
Safe work practices are paramount. Before starting any work, inspect your tools for damage and ensure they are in proper working order. Always use the appropriate personal protective equipment (PPE), including safety glasses or goggles to protect your eyes from flying debris, work gloves to prevent cuts, and hearing protection to reduce noise exposure from power tools. When working at heights, utilize stable scaffolding or ladders, ensuring they are properly secured and within safe working load limits. Maintain three points of contact when climbing or descending ladders, and always use a safety harness when working at significant heights. Ensure the work area is clear of obstructions to prevent tripping hazards. Use caution when handling sharp materials, and dispose of waste properly to prevent injuries and maintain a clean worksite.
Importance of Personal Protective Equipment (PPE)
Appropriate PPE is not optional; it’s essential for your safety. Safety glasses or goggles will shield your eyes from dust, debris, and flying fragments generated during cutting and nailing. Work gloves protect your hands from cuts and splinters from the siding material and sharp tools. Hearing protection, such as earplugs or earmuffs, is necessary to minimize noise-induced hearing loss from the prolonged use of power tools. A dust mask or respirator is recommended to protect your respiratory system from inhaling harmful dust or fumes from certain materials. When working at heights, a full-body safety harness is crucial to prevent falls. Properly fitting PPE ensures maximum protection and allows you to focus on the task at hand without compromising safety. Investing in high-quality PPE is an investment in your well-being.
Troubleshooting Common Issues
So, you’ve tackled the installation of your Hardie siding, but now you’re facing a few unexpected challenges. Don’t worry, it’s more common than you think! This section will guide you through some common problems and their solutions, helping you achieve a professional-looking finish. Remember, even experienced installers run into these issues from time to time.
Warped Panels
Warped Hardie panels are frustrating, but often avoidable. Improper storage before installation, exposure to extreme temperatures or moisture during installation, and failure to acclimate the panels to the job site’s environment are the main culprits. If you find a warped panel, assess the degree of warping. Slight warping might be manageable with careful installation techniques, focusing on securing the panel firmly at multiple points to minimize bowing. For significant warping, however, replacement is usually necessary. Before installing new panels, make sure they’ve been properly acclimated to the surrounding conditions to prevent future warping.
Nail Pops
Nail pops, where the nail head protrudes from the surface, are another common issue. This usually happens due to improper nailing techniques, such as using nails that are too short, driving nails too deeply, or not using enough nails. Over time, expansion and contraction of the siding can also cause nail pops. To repair nail pops, carefully countersink the nail head using a nail punch or setting tool. Then, fill the hole with a high-quality paintable caulk that matches the siding color. Once the caulk is dry, sand it smooth and paint to match the surrounding area.
Cracks and Chips
Minor cracks and chips can happen during installation or from accidental impacts after installation. For small cracks, a high-quality exterior-grade caulk applied carefully will often suffice. Larger cracks or chips may require patching with a cement-based repair compound specifically designed for fiber cement siding. Allow the repair compound to cure completely, then sand smooth and paint to match the existing siding. Always choose a product that matches the color and texture of your siding to minimize the visibility of the repair.
Troubleshooting Guide
Addressing issues proactively is key to a successful siding project. Here’s a quick reference guide:
- Problem: Warped Panels Solution: Acclimate panels before installation; for minor warping, secure firmly; for significant warping, replace.
- Problem: Nail Pops Solution: Countersink nail heads, fill with paintable caulk, sand smooth, and paint.
- Problem: Cracks and Chips Solution: Use exterior-grade caulk for small cracks; use fiber cement repair compound for larger damage, sand, and paint.
- Problem: Gaps between panels. Solution: Check for proper spacing during installation; use caulk to fill small gaps.
- Problem: Water penetration Solution: Inspect caulking around windows and doors; ensure proper flashing and sealing at all penetrations.
Outcome Summary
Mastering the art of attaching Hardie siding is achievable with the right approach. By following the steps outlined in this guide, you can confidently tackle this project, resulting in a beautiful and long-lasting exterior. Remember to prioritize safety, take your time, and don’t hesitate to consult professional advice when needed. With patience and attention to detail, your Hardie siding installation will enhance your home’s curb appeal for years to come. Enjoy the transformation!
Frequently Asked Questions: How To Attach Hardie Siding
Can I install Hardie siding over existing siding?
It depends on the condition of the existing siding. Generally, it’s best to remove old, damaged siding before installing Hardie. However, in some cases, with proper assessment and preparation, it might be possible.
What’s the best time of year to install Hardie siding?
Spring or fall are usually ideal. Avoid extreme heat or cold, as these conditions can affect the materials and installation process.
How long does Hardie siding typically last?
With proper installation and maintenance, Hardie siding can last for 30-50 years or more.
What type of sealant should I use?
Use a high-quality, paintable exterior-grade caulk specifically designed for use with fiber cement siding.
How do I clean Hardie siding?
Regularly clean with a garden hose and mild detergent. For stubborn stains, use a pressure washer (low pressure setting) and appropriate cleaning solutions.