How Do You Install Hardie Board Siding?
How do you install Hardie board siding? It’s a question many homeowners ask when considering a durable and attractive exterior. This guide walks you through the entire process, from understanding the different types of Hardie board and prepping your walls to the final finishing touches. We’ll cover essential tools, safety precautions, and step-by-step instructions to help you achieve professional results. Get ready to transform your home’s exterior with this long-lasting siding option!
Hardie board siding offers superior protection against the elements, boasting impressive durability and low maintenance compared to other materials. However, successful installation requires careful planning and execution. This guide will break down the process into manageable steps, providing clear explanations and visual aids to ensure a smooth and efficient installation.
Understanding Hardie Board Siding
Hardie board siding, manufactured by James Hardie, is a popular choice for homeowners seeking durable and low-maintenance exterior cladding. It’s a fiber cement product, meaning it’s a composite material made from cement, cellulose fibers, and other additives. This blend gives it unique properties that set it apart from other siding options. Let’s delve into the specifics.
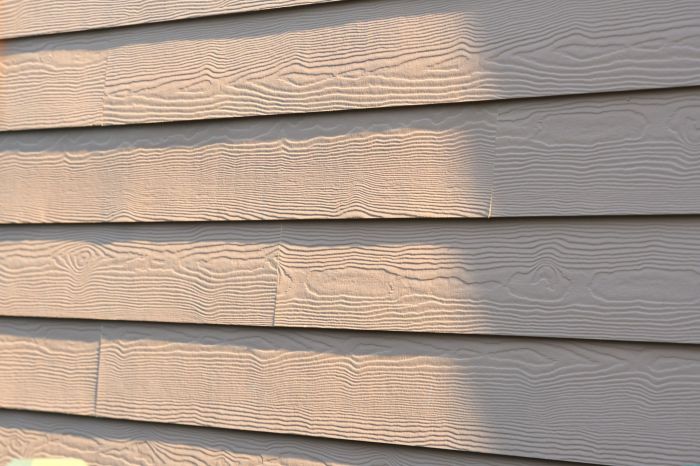
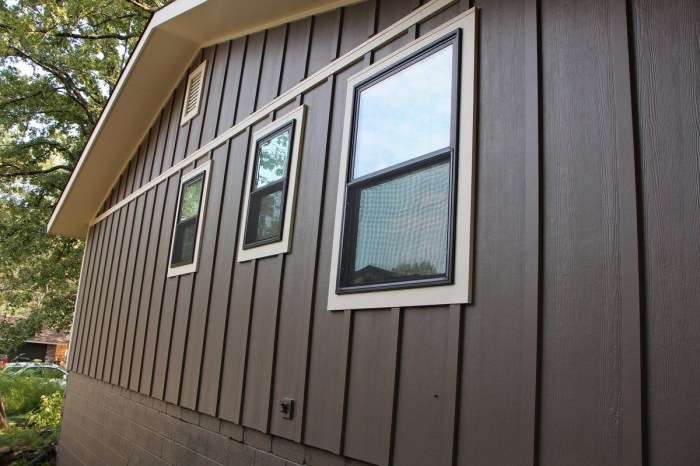
Hardie Board Siding Types
Several types of Hardie board siding cater to different aesthetic preferences and project needs. The choice depends on factors like the desired look, budget, and the complexity of the installation. Each type offers a unique texture and profile, impacting the overall appearance of your home.
Advantages and Disadvantages of Hardie Board Siding
Compared to other siding materials like vinyl, wood, or aluminum, Hardie board offers a compelling combination of benefits and drawbacks. Understanding these aspects is crucial for making an informed decision.
| Material Type | Cost | Durability | Maintenance |
|---|---|---|---|
| HardiePlank Lap Siding | Medium to High (depending on region and installer) | Excellent; resists rot, insects, and fire | Low; occasional cleaning and repainting |
| HardieShingle Siding | Medium to High | Excellent; similar durability to HardiePlank | Low; similar to HardiePlank |
| HardiePanel Vertical Siding | Medium | Excellent; similar durability to other Hardie options | Low; similar to HardiePlank |
| HardieTrim & Fascia | High | Excellent; designed for long-lasting performance in harsh conditions | Low; similar to HardiePlank |
Hardie Board Siding Feature Comparison
The table above highlights key features, allowing for a direct comparison between different Hardie board siding options. Note that costs can vary based on location and project specifics. For example, a complex installation requiring significant trim work will naturally increase the overall expense. Durability remains consistently high across all Hardie board products, making them a reliable investment for long-term protection. Minimal maintenance requirements contribute to their overall appeal.
Preparation Before Installation
Getting started with Hardie board siding installation requires careful preparation. This phase is crucial for ensuring a long-lasting, aesthetically pleasing, and structurally sound final product. Proper preparation minimizes future problems and makes the installation process smoother and more efficient. Let’s dive into the necessary steps.
Tools and Materials
Before you begin, gather all the necessary tools and materials. Having everything readily available saves time and frustration. This will prevent delays and ensure a more efficient workflow.
- Measuring tape and level
- Circular saw with a fine-tooth blade designed for cutting fiber cement
- Safety glasses and hearing protection
- Jigsaw for intricate cuts
- Hammer and nail gun (with appropriate nails for Hardie board)
- Caulk gun and exterior-grade caulk
- Putty knife for filling gaps
- Ladder and scaffolding (if necessary)
- Hardie board siding panels (in the correct size and quantity)
- Flashing and trim pieces (as needed)
- Underlayment (e.g., house wrap)
- Fasteners (appropriate for Hardie board)
Wall Surface Preparation
Thorough wall preparation is essential for a successful Hardie board siding installation. This involves inspecting the existing sheathing, addressing any issues, and ensuring a clean, level surface ready for the siding.
- Sheathing Inspection: Carefully inspect the existing wall sheathing for damage, rot, or loose boards. Replace any damaged sections with new sheathing material, ensuring proper overlap and fastening.
- Repairing Damaged Areas: Repair any holes or gaps in the sheathing using appropriate materials like wood filler or patching compounds. Allow sufficient drying time before proceeding.
- Leveling the Surface: Ensure the sheathing is level and plumb. Any significant unevenness should be addressed before installing the siding. This might involve shimming or adding furring strips to create a smooth, consistent surface.
- Cleaning the Surface: Remove any loose debris, dirt, or dust from the wall surface. A clean surface ensures proper adhesion of the siding and prevents future problems.
- Installing House Wrap: Apply a weather-resistant house wrap over the sheathing to provide an additional layer of protection against moisture. Overlap the seams according to the manufacturer’s instructions and secure it with staples.
Safety Precautions
Safety should always be the top priority during any construction project. Taking the necessary precautions will protect you from injury and ensure a smooth installation.
- Wear appropriate personal protective equipment (PPE), including safety glasses, hearing protection, work gloves, and a dust mask.
- Use caution when working at heights. Utilize ladders and scaffolding properly and ensure they are stable and secure.
- Follow all manufacturer’s instructions for handling and cutting Hardie board. Fiber cement can be abrasive and should be handled with care.
- Dispose of all waste materials properly and by local regulations.
- Be aware of overhead power lines and other potential hazards.
- Never work alone; always have a spotter or helper available, especially when working at heights.
Installation Process
Getting started with Hardie board siding installation requires a solid foundation—literally. Proper sheathing and framing are crucial for a long-lasting, aesthetically pleasing, and structurally sound installation. This section details the correct procedures to ensure your siding project is built to last.
Proper sheathing and framing provide a stable, even surface for the Hardie board to attach to, preventing issues like bowing, cracking, and uneven gaps. It also protects the underlying structure from the elements. Choosing the right sheathing material and employing the correct fastening techniques are key to a successful installation.
Sheathing Material and Attachment
The most common sheathing material used under Hardie board siding is oriented strand board (OSB) or plywood. Both offer excellent strength and stability. OSB is generally more cost-effective, while plywood can offer a smoother surface for some installers. Regardless of your choice, ensure the sheathing is properly graded for exterior use and meets local building codes. Fastening is critical; use corrosion-resistant nails or screws appropriate for the sheathing material and your local climate. Spacing between fasteners should be consistent and follow manufacturer recommendations to avoid splitting the sheathing. Generally, this means spacing nails or screws every 6 inches along the edges and 8 inches along the field. For thicker sheathing, you might need to adjust spacing slightly.
Framing Techniques for Different Wall Configurations
Proper framing is essential for creating straight walls and managing transitions around windows, doors, and corners. Consistent framing ensures the sheathing sits flush and the Hardie board can be installed evenly. For corners, you’ll typically use corner studs or blocking to create a solid base for the sheathing. Around windows and doors, you’ll need to frame the openings accurately, ensuring a proper fit for the sheathing and preventing gaps. Use a level and plumb bob frequently to ensure accuracy. All framing members should be securely fastened to the wall studs with appropriate fasteners, following the manufacturer’s guidelines and local building codes.
Diagram of Sheathing and Framing Techniques
Imagine a diagram showing three sections: a simple wall section, a corner section, and a section with a window.
Simple Wall Section: This shows evenly spaced studs running vertically, with OSB sheathing nailed horizontally across them, overlapping seams at least 6 inches. Fasteners are marked, showing consistent spacing.
Corner Section: This shows two walls meeting at a 90-degree angle. Corner studs or blocking are visible, providing a solid backing for the sheathing at the corner. The sheathing is carefully installed to ensure a tight, weatherproof corner, with the seams staggered on both walls. Again, fastener placement is indicated.
Window Section: This shows a window opening framed with a header, cripple studs, and side jambs. The sheathing is cut precisely to fit around the window frame, ensuring a tight seal. Flashing is indicated around the window frame to prevent water penetration. The diagram clearly shows how the sheathing wraps around the window frame, leaving no gaps. Fasteners are again clearly shown and consistently spaced. This ensures that the window is properly supported and sealed against moisture. This is crucial for preventing water damage and maintaining the integrity of the Hardie board siding.
Installation Process
Source: guardingyou.com
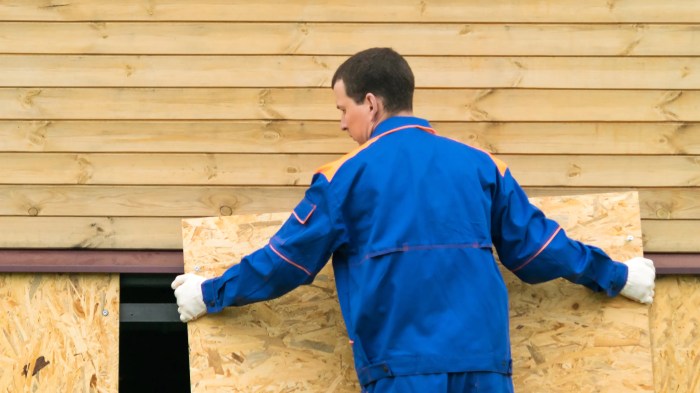
Now that you’ve prepped your house and understand the basics of Hardie board, let’s get into the actual installation. This process requires precision and attention to detail, so take your time and follow these steps carefully. Remember, safety first – always wear appropriate safety gear, including gloves and eye protection.
Installing Hardie board siding involves a combination of careful measuring, precise cutting, and secure fastening. Proper installation ensures a long-lasting, weather-resistant exterior for your home. We’ll cover installing the panels themselves, along with crucial accessories like J-channels and corner trim.
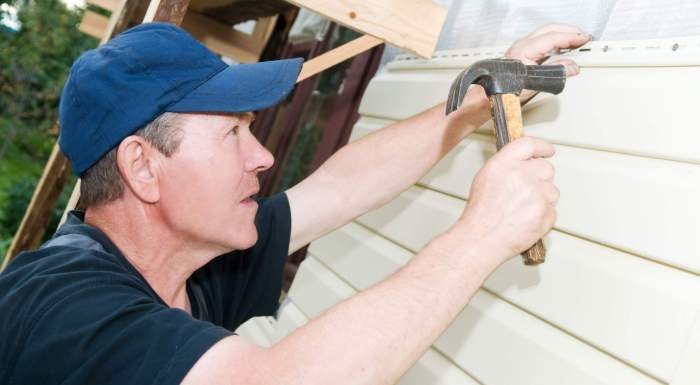
Siding Panel Installation
Installing the siding panels is a straightforward process once you understand the proper techniques. The key is to maintain consistent overlap and ensure every panel is securely fastened.
- Begin at a corner, starting with a full-length panel. Use a level to ensure it’s perfectly plumb.
- Secure the panel using galvanized nails, spaced approximately 6 inches apart, driving them just below the surface of the board to avoid splitting. Nail near the edges and in the center of the panel.
- Install subsequent panels, overlapping the previous panel by the manufacturer’s recommended amount (usually 1/2 inch). Maintain a consistent overlap for a clean, professional look.
- Use a utility knife or circular saw with a fine-tooth blade for precise cuts around windows, doors, and other obstacles. Always wear safety glasses when cutting.
- For larger cuts, use a circular saw with a carbide-tipped blade specifically designed for fiber cement. Make sure the blade is sharp to avoid chipping or tearing the Hardie board.
- As you work your way up, use a level frequently to check the alignment of the panels. Minor adjustments can be made by carefully prying and repositioning panels before fastening them.
Installing J-Channels, Corner Trim, and Other Accessories, How do you install Hardie board siding
These accessories provide a neat finish and protect the edges of your siding. Proper installation is crucial for a professional-looking and weathertight exterior.
- J-channels are installed at the edges of the siding, providing a clean, finished look and protecting the edges of the panels from the elements. They should be nailed securely using galvanized nails.
- Corner trim pieces are used to cover the exterior corners of your house. They should be mitered at a 45-degree angle for a seamless fit. Use a miter saw for accurate cuts.
- Other accessories, such as window and door trim, are installed to create a clean and professional finish around openings. These pieces are typically nailed in place, ensuring proper alignment and a secure fit.
Installing Hardie Board Siding Around Windows and Doors
This requires careful measurement and precise cutting to ensure a snug fit and a professional appearance. Take your time and double-check your measurements before making any cuts.
- Measure the area around the window or door carefully, taking into account the width of the trim pieces you’ll be using.
- Cut the Hardie board panels to fit the opening, using a utility knife or circular saw. Ensure your cuts are precise to avoid gaps.
- Install the window or door trim, ensuring a tight fit against the Hardie board panels and the window or door frame.
- Fasten the trim pieces using galvanized nails, spaced evenly for a secure hold. Conceal nail heads as much as possible.
- Caulk any gaps or seams to prevent water infiltration. Use a high-quality exterior-grade caulk.
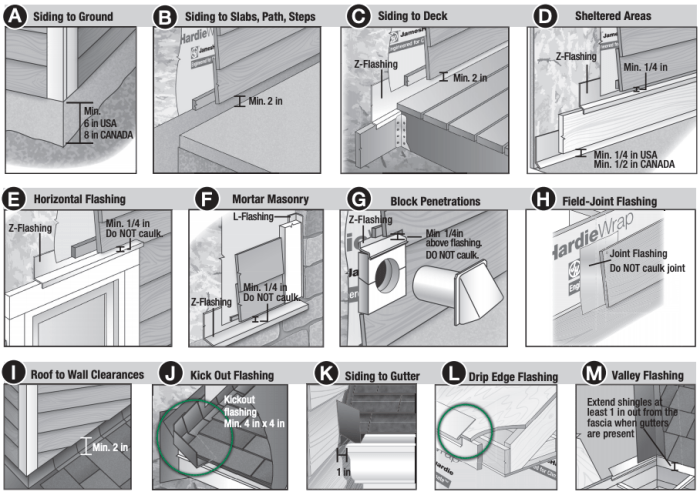
Finishing Touches and Caulking: How Do You Install Hardie Board Siding

Source: perfectexteriorsmn.com
Getting those final details right is crucial for long-lasting, weatherproof Hardie board siding. Proper caulking and sealing are key to preventing water damage and ensuring a professional finish that will stand the test of time. Don’t underestimate the importance of this final step; it’s the difference between a good job and a great one.
Caulking acts as a critical barrier against moisture intrusion. Water can seep into the smallest cracks and gaps, leading to rot, mold, and expensive repairs down the line. Careful attention to sealing around windows, doors, and other penetrations is essential to prevent these problems. We’ll cover the best caulking techniques and products to ensure your Hardie board siding remains beautiful and protected for years to come.
Caulk Selection and Application
Choosing the right caulk is just as important as applying it correctly. Different caulks have different properties and are suited to various applications. For Hardie board siding, you’ll generally want a high-quality, paintable sealant that’s flexible and durable enough to withstand temperature fluctuations and movement. Examples include acrylic latex caulk for general use and silicone caulk for areas needing superior water resistance, like around windows and doors. Always follow the manufacturer’s instructions for application and drying time. For best results, use a caulking gun to apply a smooth, even bead, tooling it smooth with a wet finger or a specialized caulking tool. Remember to remove excess caulk immediately before it dries.
Achieving a Professional Finish
Precision is key to a professional-looking finish. Accurate cutting and fitting of the Hardie board panels minimizes gaps and ensures a clean, seamless appearance. Use a sharp utility knife or circular saw with a fine-tooth blade for clean cuts. Measure twice, cut once – this adage is especially important with Hardie board. Take your time and ensure proper alignment before securing each panel. Any gaps larger than 1/8 inch should be filled with caulk before painting. Consider using a backer rod in larger gaps to prevent excessive caulk usage and ensure a more durable seal. Paying attention to these details makes a huge difference in the overall aesthetic appeal of your siding project. A neatly installed and caulked Hardie board siding project speaks volumes about the quality of workmanship.
Maintenance and Care
Hardie board siding, while incredibly durable, still requires regular maintenance to ensure its longevity and beauty. Neglecting upkeep can lead to costly repairs down the line, so a proactive approach is key. This section will cover common problems, cleaning methods, and a suggested maintenance schedule.
Common Problems and Solutions
Understanding potential issues with your Hardie board siding allows for early detection and prevention of significant damage. Problems range from minor cosmetic blemishes to more serious structural concerns.
- Algae and Mold Growth: Damp, shady areas are prone to algae and mold growth, appearing as dark streaks or discoloration. Regular cleaning (detailed below) is the best preventative measure. Severe cases may require a specialized cleaning solution designed for exterior surfaces.
- Cracks and Chips: Impact damage from flying debris or accidental bumps can cause cracks or chips. Small chips can be filled with a compatible caulk or patching compound. Larger cracks might require professional repair or section replacement.
- Paint Peeling or Fading: Exposure to the elements can cause paint to fade or peel over time. Regular inspections and repainting as needed will maintain the siding’s appearance and protect it from further deterioration. Using high-quality exterior paint specifically designed for fiber cement is crucial.
- Water Damage: Improper installation or damage to caulking can lead to water intrusion. Regular inspection of caulking around windows, doors, and other penetrations is essential. Addressing any leaks promptly prevents mold growth and structural damage.
Cleaning and Maintenance
Keeping your Hardie board siding clean is straightforward and crucial for preserving its appearance and protecting it from damage.
Regular cleaning should involve using a pressure washer set to a low pressure setting (around 1500-2500 PSI) to avoid damaging the surface. Always test the pressure washer in an inconspicuous area first. A solution of mild detergent and water can be used for heavier soiling, followed by a thorough rinsing. For stubborn stains, a specialized cleaning solution designed for fiber cement siding may be necessary. Always follow the manufacturer’s instructions carefully. Avoid using abrasive cleaners or brushes, as these can scratch the surface.
Routine Maintenance Schedule
A regular maintenance schedule will help you stay on top of potential problems and ensure the longevity of your Hardie board siding.
| Task | Frequency | Notes |
|---|---|---|
| Inspection for cracks, chips, and damage | Annually | Pay close attention to caulking around windows and doors. |
| Cleaning with a pressure washer and mild detergent | Twice yearly (spring and fall) | Use low pressure to avoid damage. |
| Caulking repair (as needed) | As needed | Replace any cracked or deteriorated caulking. |
| Repainting (as needed) | Every 5-10 years (depending on paint quality and exposure) | Use high-quality exterior paint for fiber cement siding. |
Epilogue
Source: elitehomeexteriorsnw.com
Installing Hardie board siding is a rewarding project that significantly enhances your home’s curb appeal and longevity. By following the steps outlined in this guide, from careful preparation and precise installation to meticulous finishing and maintenance, you can achieve a beautiful and long-lasting exterior. Remember, safety is paramount throughout the entire process. With a little patience and attention to detail, you can confidently tackle this project and enjoy the results for years to come. So grab your tools, and let’s get started!
Common Queries
Can I install Hardie board siding myself, or should I hire a professional?
While DIY installation is possible, it requires experience with construction and tools. If you’re unsure, hiring a professional ensures a proper and safe installation.
What’s the best time of year to install Hardie board siding?
Spring or fall are ideal, as they offer moderate temperatures and less chance of extreme weather interfering with the installation process.
How long does Hardie board siding typically last?
With proper installation and maintenance, Hardie board siding can last 30-50 years or more.
What kind of warranty does Hardie board siding come with?
Check with the manufacturer, as warranties vary depending on the specific product and installation.
How much does Hardie board siding cost?
The cost varies based on the type of siding, labor costs, and project size. Get multiple quotes for accurate pricing.