How Do You Install Hardie Plank?
How do you install Hardie Plank? That’s a great question, especially if you’re tackling a siding project. This guide walks you through the entire process, from prepping your walls and gathering the right tools to nailing down those planks (literally!) and finishing with a professional-looking caulk job. We’ll cover everything from measuring and cutting techniques to handling corners and troubleshooting common problems. Get ready to transform your home’s exterior!
We’ll cover essential prep work like surface cleaning and weather considerations, then dive into the nitty-gritty of measuring, cutting, and installing Hardie Plank. Learn how to use various tools safely and efficiently, from miter saws to hand tools. We’ll also explore different methods for handling corners and edges, ensuring a flawless finish. Finally, we’ll discuss caulking techniques and troubleshooting common installation issues. By the end, you’ll be confident in your ability to install Hardie Plank like a pro.
Understanding Hardie Plank Installation Prerequisites
Source: prosuperiorconstruction.com
Getting started with Hardie Plank siding installation requires careful preparation. Overlooking even small details can lead to problems down the line, impacting the longevity and aesthetics of your finished project. This section covers the essential tools, surface preparation, weather considerations, and materials checklist to ensure a smooth and successful installation.
Necessary Tools for Hardie Plank Installation
Having the right tools makes the job easier and safer. The following table lists the essential tools, their purpose, and some safety considerations. While brand recommendations are optional, choosing quality tools will improve your work and potentially extend their lifespan.
| Tool Name | Purpose | Brand Recommendation (Optional) | Safety Precautions |
|---|---|---|---|
| Measuring Tape | Accurate measurements for cutting and spacing. | Stanley, Lufkin | Ensure the tape measure is in good condition; avoid using a damaged or inaccurate one. |
| Circular Saw with Fine-Tooth Blade | Cutting Hardie Plank to size. | Makita, DeWalt | Always wear safety glasses and a dust mask. Use a clamp to secure the plank while cutting. |
| Jigsaw | Cutting intricate shapes and curves. | Bosch, Ryobi | Similar safety precautions as with the circular saw. |
| Nail Gun | Fastening the planks to the wall. | Senco, Hitachi | Always follow the manufacturer’s instructions for safe operation. Wear safety glasses and hearing protection. |
| Level | Ensuring straight and even installation. | Johnson Level, Empire | Regularly check the level for accuracy. |
| Caulk Gun | Applying caulk to seal gaps and joints. | Any reputable brand | Follow the caulk manufacturer’s instructions for application. |
| Safety Glasses | Protecting eyes from debris and flying objects. | Any reputable brand with ANSI Z87.1 rating | Always wear them while using power tools. |
| Dust Mask | Protecting lungs from inhaling dust created during cutting. | 3M, Honeywell | Choose a mask with appropriate N95 or higher filtration. |
| Work Gloves | Protecting hands from splinters and cuts. | Any reputable brand with good grip | Ensure gloves are in good condition and fit properly. |
Surface Preparation for Hardie Plank Installation
Proper surface preparation is crucial for a successful and long-lasting installation. This involves thoroughly cleaning and treating the wall to ensure a secure bond for the siding. Any existing damage needs to be repaired before installation begins.
Before installing Hardie Plank, the wall must be clean and free of any loose debris, dirt, or old paint. Power washing is often the best method for thorough cleaning. After cleaning, allow the wall to completely dry. If there are any damaged areas, they should be repaired using appropriate patching materials. For example, holes should be filled with wood filler and sanded smooth. Once the wall is clean, dry, and repaired, it may be necessary to apply a primer specifically designed for exterior use and compatible with fiber cement siding. This primer will improve the adhesion of the Hardie Plank and provide a uniform surface for painting.
Weather Conditions and Hardie Plank Installation
Weather plays a significant role in Hardie Plank installation. Extreme temperatures, rain, and high winds can negatively affect the installation process and the longevity of the siding. Ideal conditions include temperatures between 40°F and 90°F (4°C and 32°C) with low humidity and no precipitation. Avoid installing during periods of heavy rain, snow, or strong winds, as these can damage the material and compromise the installation. Direct sunlight can also affect the adhesive, so consider scheduling installation during cooler parts of the day.
Materials Checklist for Hardie Plank Installation
Before you begin, gather all necessary materials. This will streamline the installation process and prevent delays. The quantity of each material will depend on the size of your project.
- Hardie Plank siding (calculate the required amount based on your wall area)
- Nails specifically designed for Hardie Plank
- Caulk (exterior grade, paintable)
- Primer (exterior grade, compatible with fiber cement)
- Paint or stain (if desired)
- Flashing (for corners, windows, and doors)
- J-channels and other trim pieces (as needed)
- Safety equipment (safety glasses, dust mask, gloves, hearing protection)
Measuring and Cutting Hardie Plank
Source: edcoproducts.com
Getting accurate cuts is crucial for a professional-looking Hardie Plank installation. Precise measurements and the right cutting techniques will save you time, material, and frustration. This section covers various methods for achieving accurate cuts, from using power tools to hand tools, and addresses specific challenges like cutting around openings.
Accurate measurements are the foundation of successful cutting. Always double-check your measurements before making any cuts. Use a measuring tape to determine the exact length needed for each plank, accounting for overlaps and any necessary adjustments around windows and doors. Mark your cutting lines clearly with a pencil or marking tool. Remember to factor in expansion and contraction of the material due to weather changes; consult your Hardie Plank manufacturer’s instructions for specific recommendations.
Using a Miter Saw for Precise Cuts
The miter saw is ideal for making precise, straight cuts in Hardie Plank. Its ability to make angled cuts is especially useful for mitering corners. However, safety is paramount when using power tools. Always wear safety glasses and hearing protection. Ensure the saw blade is sharp and properly aligned. Secure the Hardie Plank firmly against the fence of the miter saw to prevent kickback. Make slow, steady cuts, avoiding jerky movements. Never reach over the blade while the saw is running. After cutting, carefully remove the cut piece and inspect the cut for accuracy. If using a miter saw for multiple cuts, regularly check the blade for wear and clean away any dust buildup.
Cutting Around Windows and Doors
Cutting Hardie Plank around windows and doors requires careful planning and precise measurements. Start by accurately measuring the opening. Use a jigsaw or a hand saw for more intricate cuts, particularly around corners. For straight cuts, a circular saw can be efficient, but it’s essential to use a fine-toothed blade to prevent chipping. Always make test cuts on scrap pieces of Hardie Plank to ensure you’re comfortable with the cutting technique and blade before cutting the actual piece to be installed. When making curved cuts, take your time and make multiple passes with the saw to avoid breaking the plank.
Cutting Hardie Plank Using Hand Tools
While power tools offer speed and precision, hand tools can be effective for smaller projects or when working in confined spaces. A hand saw with a fine-toothed blade is suitable for making straight cuts. For more complex cuts, a coping saw or a jigsaw can be used. To use a hand saw, mark your cutting line. Position the saw blade carefully along the line and begin cutting with slow, controlled strokes. Apply even pressure and maintain a consistent pace. A scoring tool can help prevent splintering along the cut line. For curved cuts, use a jigsaw or coping saw, employing slow, careful movements to maintain accuracy. Remember to always wear appropriate safety glasses.
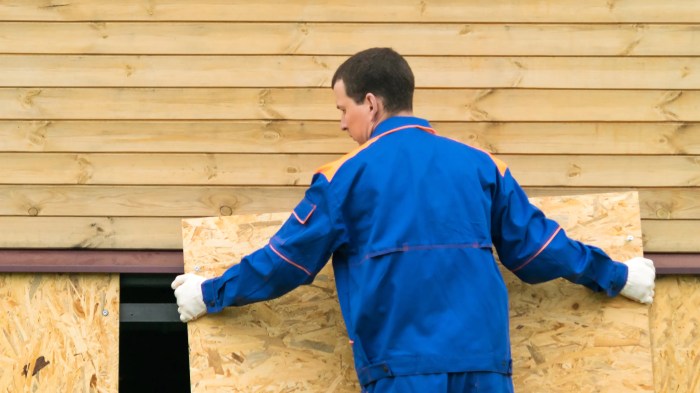
Installing Hardie Plank
Getting started with Hardie Plank installation is crucial for a successful and aesthetically pleasing final product. Proper alignment and fastening of the first piece sets the tone for the entire project, impacting the straightness of the siding and the overall look. Pay close attention to detail in this initial phase to save yourself headaches later on.
The first piece of Hardie Plank acts as your baseline for everything else. Think of it like the foundation of a house – if it’s off, the rest will be too. Precise placement and secure fastening are paramount.
Installing the First Piece of Hardie Plank
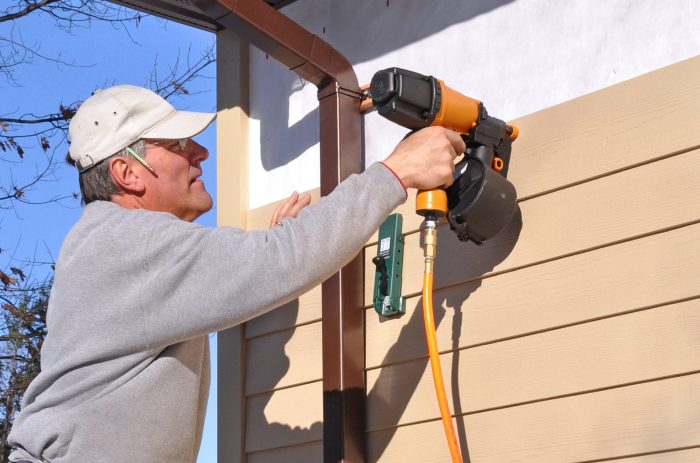
Begin by aligning the first plank with a corner or a pre-marked starting point, ensuring it’s perfectly level and plumb. Use a level and a plumb bob to check for accuracy. This initial piece should be butted tightly against the corner or starting point, leaving no gaps. Then, begin fastening, starting at the top and working your way down. Use galvanized exterior-grade nails or screws specifically designed for Hardie Plank. These fasteners are corrosion-resistant and designed to hold up to the elements. Improper fasteners will lead to problems down the line. Overdriving fasteners can split the plank, while underdriving them will compromise the hold.
Fastener Selection and Spacing
The manufacturer’s instructions should always be consulted for specific fastener requirements, but generally, you’ll want to use 8d galvanized nails or screws specifically designed for fiber cement siding. The recommended spacing is usually around 6 inches apart along the top and bottom edges and around 12 inches apart in between. This spacing ensures adequate support and prevents warping or buckling. Using the wrong fasteners or spacing them incorrectly can lead to loose planks, which will be noticeable and could cause issues with water penetration.
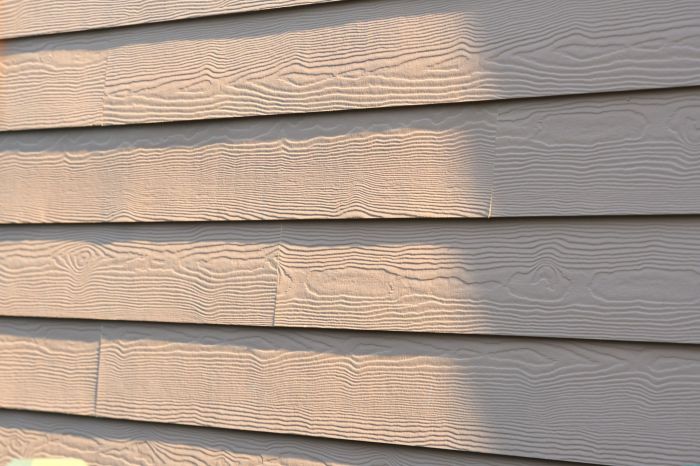
Maintaining Consistent Spacing Between Planks
Maintaining consistent spacing between planks is key to achieving a professional-looking finish. Use spacers to maintain a uniform gap, usually around 1/8 to 1/4 inch, depending on the manufacturer’s recommendations. This gap allows for expansion and contraction of the planks due to temperature changes and prevents buckling. Inconsistent spacing will create an uneven and unprofessional appearance. A simple spacer system, such as small pieces of wood or purpose-made plastic spacers, can greatly improve consistency. Regularly check the spacing throughout the installation process to maintain accuracy.
Common Mistakes During Initial Installation
One common mistake is not checking for level and plumb before fastening the first plank. Another frequent error is using the wrong type of fasteners or not spacing them correctly. This can lead to issues with water penetration and the overall integrity of the siding. Failing to maintain consistent spacing between planks also results in a less than professional appearance. Finally, starting without a well-defined plan, including accurate measurements and a clear understanding of the installation process, can also cause significant problems. Proper planning and careful execution are key to avoid these common pitfalls.
Working with Corners and Edges
Neat corners are crucial for a professional-looking Hardie Plank installation. Getting them right involves careful planning and the correct use of trim pieces. This section will guide you through the process, covering both inside and outside corners.
Handling corners effectively is key to a finished look that’s both attractive and durable. Different methods are needed for inside and outside corners, and understanding these differences is vital for success. Using the right trim pieces, like J-channels, will make the process much easier and improve the overall quality of your installation.
Inside Corner Installation
Inside corners require a slightly different approach than outside corners. The primary method involves using a J-channel. First, install the J-channel into the corner, ensuring it’s perfectly aligned and plumb. Then, install the Hardie Plank, butting the edges neatly against the J-channel’s flanges. This creates a clean, seamless finish, protecting the raw edges of the siding from the elements. For extra strength and to prevent gaps, use construction adhesive along the edges before inserting the plank into the J-channel. Finally, caulk any gaps between the J-channel and the siding for a watertight seal.
Outside Corner Installation
Outside corners can be finished in a couple of ways. The most common method uses outside corner trim. This trim piece is designed to cover the raw edges of two meeting planks, creating a sharp, defined corner. Install the corner trim first, ensuring it’s perfectly aligned and plumb. Then, install the Hardie Plank, ensuring the edges butt snugly against the trim. This method provides a strong, weather-resistant finish. Alternatively, you can use two pieces of J-channel, creating a more complex but equally effective corner. This approach requires more precision but can offer a more visually appealing finish. The second J-channel acts as a return to protect the raw edges. Similar to the inside corner installation, using construction adhesive will strengthen the bond and prevent movement over time.
Using J-Channels and Other Trim Pieces, how do you install Hardie plank
J-channels are versatile and are used for both inside and outside corners, as well as for finishing around windows and doors. They provide a clean, finished look while protecting the edges of the siding. Other trim pieces, such as corner trim, window trim, and casing, are essential for creating a professional finish. These pieces come in various styles and sizes to match your siding and overall design. Selecting the right trim pieces is crucial for aesthetics and structural integrity.
Creating a Clean Corner Finish: Step-by-Step
1. Measure and cut: Accurately measure and cut the Hardie Plank and trim pieces to fit the corner. Remember to account for expansion and contraction.
2. Apply adhesive: Apply construction adhesive to the back of the trim pieces and the edges of the Hardie Plank for a secure bond.
3. Install the trim: Carefully install the J-channel or corner trim, ensuring it’s perfectly plumb and aligned.
4. Install the Hardie Plank: Install the Hardie Plank, ensuring it’s flush against the trim.
5. Caulk the seams: Caulk all seams and gaps between the trim and the Hardie Plank to create a weathertight seal. This is crucial to prevent water damage.
Tools for Cutting and Installing Trim
A selection of tools will make working with trim easier and more precise. This list isn’t exhaustive, but it covers the essentials:
Measuring tape, speed square, pencil, circular saw with fine-tooth blade (for clean cuts), miter saw (for precise angle cuts), utility knife, caulking gun, safety glasses, work gloves, and a level. A nail gun can also speed up installation significantly, though hammering is always an option.
Finishing Touches and Caulking
Source: prosuperiorconstruction.com
Proper caulking is crucial for a long-lasting, weather-resistant Hardie Plank installation. Ignoring this step can lead to water damage, compromising the integrity of your siding and potentially causing significant structural problems down the line. Caulking creates a watertight seal, preventing moisture from penetrating the seams and joints of your Hardie Plank.
Caulking materials and application methods are important considerations. Different caulks offer varying degrees of flexibility, durability, and weather resistance. Choosing the right type is key to ensuring a successful and long-lasting seal. Cleaning up excess caulk is also important for a professional finish.
Caulk Selection and Application
Several types of caulk are suitable for Hardie Plank, each with its advantages and disadvantages. High-quality, paintable acrylic latex caulk is a popular choice due to its flexibility, ease of application, and paintability. Silicone caulk, known for its superior water resistance, is ideal for areas prone to significant moisture exposure, such as around windows and doors. However, silicone caulk is less paintable than acrylic latex. Always follow the manufacturer’s instructions for application and drying times. Before applying any caulk, ensure the surfaces are clean, dry, and free of dust or debris for optimal adhesion. Apply a continuous bead of caulk into all joints and seams, using a caulking gun. Ensure that the bead is smooth and even, filling the gap.
Cleaning Excess Caulk
Removing excess caulk is essential for a neat and professional finish. While the caulk is still wet, use a damp sponge or a putty knife to smooth and remove any excess material. For acrylic latex caulk, a simple damp cloth will often suffice. For silicone caulk, a slightly more aggressive approach may be necessary, but always be careful not to damage the surrounding Hardie Plank. Once the caulk has dried, any remaining residue can usually be removed with a razor blade scraper. Always follow the manufacturer’s instructions regarding cleanup.
Visual Guide to Caulking Techniques
Imagine a corner joint between two Hardie Plank pieces. Apply a continuous bead of caulk along the entire seam, pressing gently to ensure complete filling. The caulk should be smooth and slightly recessed, avoiding any buildup.
Next, visualize a window trim detail. Apply a bead of caulk where the Hardie Plank meets the window frame. The caulk should create a smooth, sealed connection, preventing water from seeping behind the trim. Make sure to fill any gaps.
Consider the situation of a seam between two horizontally installed planks. Apply a bead of caulk to the seam, smoothing it out with a damp finger or a caulking tool. Ensure the bead is even and consistent across the entire length of the joint.
Finally, think of an area where the Hardie Plank meets a different material, such as brick or stone. Apply a bead of caulk, ensuring complete coverage of the joint and creating a smooth transition between the materials. The goal is to create a weatherproof seal, protecting the underlying structure from moisture. For larger gaps, you might need to use backer rod to fill the gap before applying the caulk for a more efficient and durable seal.
Addressing Common Installation Issues
Installing Hardie Plank siding can present some challenges, even for experienced DIYers. Understanding common problems and their solutions is key to a successful and long-lasting installation. This section will address some frequent issues, offering practical troubleshooting steps to help you navigate potential difficulties.
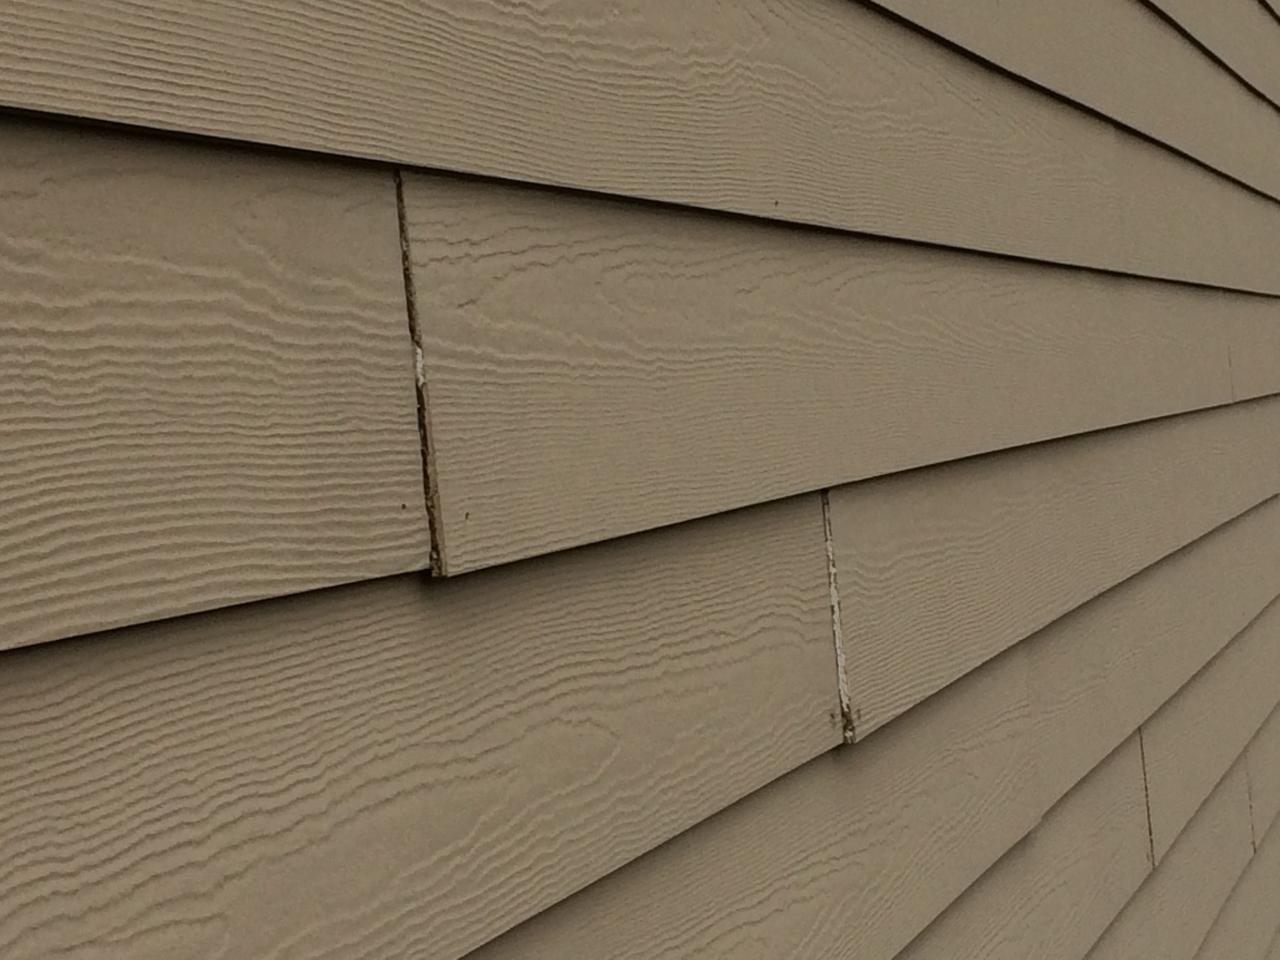
Warping and Cracking
Warping and cracking of Hardie Plank are often caused by improper handling, storage, or installation. Hardie Plank, while durable, is still susceptible to damage if not treated carefully. Exposure to moisture before installation can lead to warping, while forcing planks into place or using excessive force during cutting can cause cracking.
Solutions for Warping and Cracking
Preventing warping begins with proper storage. Keep planks covered and protected from the elements before installation. If warping occurs *before* installation, gently try to straighten the plank by placing it flat under weight for a few days. If warping happens *after* installation, unfortunately, replacing the warped section is usually necessary. For cracks, carefully assess the damage. Small cracks may be filled with appropriate caulk, but larger cracks usually require plank replacement. Always use sharp blades when cutting to minimize the risk of cracking.
Uneven Surfaces and Misaligned Planks
Uneven wall surfaces are a common challenge. Failing to address these irregularities before installation can lead to misaligned planks and an unsatisfactory final look. Similarly, improper measurement and cutting can result in planks that don’t fit together seamlessly.
Troubleshooting Uneven Surfaces and Misalignment
Before starting, carefully assess the wall’s surface. Use shims to create a level surface for the first row of planks. A consistent, level base is crucial. For significant irregularities, consider furring strips to create a more even plane. Accurate measurements and precise cutting are paramount. Double-check your measurements multiple times before cutting each plank to ensure proper fit and alignment. If planks are misaligned, carefully remove the affected plank(s) and re-install, correcting the underlying issue.
Importance of Following Manufacturer’s Instructions
Following the manufacturer’s instructions is not just a suggestion; it’s essential for a successful installation and a long-lasting result. The manufacturer’s instructions provide detailed guidance on every aspect of the installation process, from preparation to finishing touches. Ignoring these instructions significantly increases the risk of encountering problems such as warping, cracking, and premature failure. They often include specific recommendations for acclimatization, cutting techniques, fastening methods, and caulking, all crucial for avoiding common installation pitfalls. Taking the time to thoroughly read and understand the instructions will save time, effort, and potentially significant costs in the long run.
Ultimate Conclusion

Source: architecturesideas.com
Installing Hardie Plank might seem daunting at first, but with careful planning and attention to detail, you can achieve a stunning and durable exterior. Remember to prioritize safety, use the right tools, and follow manufacturer instructions. By mastering the techniques outlined in this guide, you’ll not only save money but also gain a sense of accomplishment from completing a challenging DIY project. Now go forth and transform your home’s exterior!
Answers to Common Questions: How Do You Install Hardie Plank
Can I install Hardie Plank in cold weather?
While Hardie Plank can tolerate some cold, extreme temperatures can affect the material’s performance and adhesive. Check the manufacturer’s recommendations for ideal installation temperatures.
How long does Hardie Plank siding last?
Hardie Plank is known for its durability and longevity, typically lasting 30-50 years or more with proper installation and maintenance.
What type of nails should I use?
Use galvanized or stainless steel nails specifically designed for Hardie Plank. The manufacturer’s instructions will specify the correct nail size and type.
What happens if I damage a plank during installation?
Try to minimize damage, but if it occurs, carefully cut out the damaged section and replace it with a new plank, ensuring proper alignment and fastening.
Can I paint Hardie Plank immediately after installation?
Allow sufficient drying time before painting. Check the manufacturer’s recommendations for the ideal waiting period.